
Joy Rides is a series all about bikes, and the stories behind those bikes. Sometimes they belong to our staff, other times they belong to our members. In this edition, member Harry Beaumont tells the tale of his world-travelling machine and the many decisions he made during the build process.
Colloquialisms are funny things. Say you’re "heading off on your OE" to anyone in New Zealand and they’ll immediately ask you where you’re off to before regaling you with stories of their own overseas adventures from their youth. The expression doesn’t seem to have caught on further afield, so a quick explainer. Given our geographical proximity, heading almost anywhere overseas is a big deal, especially for New Zealanders. So when you decide to go off for an extended bout of travel in far-flung destinations it’s termed your "Overseas Experience."
I had planned to head over to North America to ride bikes and ski in 2020 while attending as little class as possible on a university exchange, but I’m sure you can guess how that turned out. Instead, I got a job and started plotting. I figured out I would be doing a fair bit of travelling alone when it became clear that none of my friends had been obsessively saving for the last eight years to fund a trip. Soon I concluded that bikepacking around Europe and meeting up with friends along the way would be sweet. Insert tired N+1 cliche here, but it also gave me an excuse to get another bike.
While I’d owned plenty of bikes, up until this point I had never built one up from a bare frame. A blank canvas, ready for all my endless musings, and usually only shared with a few other bike-mad friends (thanks and sorry Olly and Logan).
Of course, as is often the case, there were some budgetary constraints. Even though I’d had an enforced additional three years of saving for this trip, I was conscious that every frivolous choice I made here was something I might miss out on overseas. The result? Some questionable decisions, but a fairly sensible build for a bike that would see serious service and roll-in risk of theft.
Where to start
Early on, I decided a mountain bike would give me the most versatility. Sure, gravel bikes have come a long way, but there’s a very good reason that flat-bar mountain bikes dominate the fields at major bikepacking events. It would also give me the most versatility for any terrain I encounter.
Realistically, the frame was always going to be steel. I liked the idea of the weight savings of carbon, but the vibe wasn’t quite right for my vision of the build. Nothing against aluminum, but I wanted this frame to be around a long way down the line, and I’m liable to get hung up on the potential for metal fatigue (imagined or otherwise). A titanium frame would blow most of the budget for the trip, although it would look great leaning against a tree while I foraged for food in the French countryside after I ran out of Euros. I’d never owned a steel bike, and it just seemed right.
I briefly considered a Kona Unit X for its smart design and outstanding value, but the low-grade Reynolds 520 tubing was a little uninspiring – and I was under no illusion that I’d occasionally need the bike to provide the inspiration that long, flat, and straight roads with a grey sky overhead could not. Also, there were no pink frames left in New Zealand, and if I’m honest, that colour was the main drawcard.
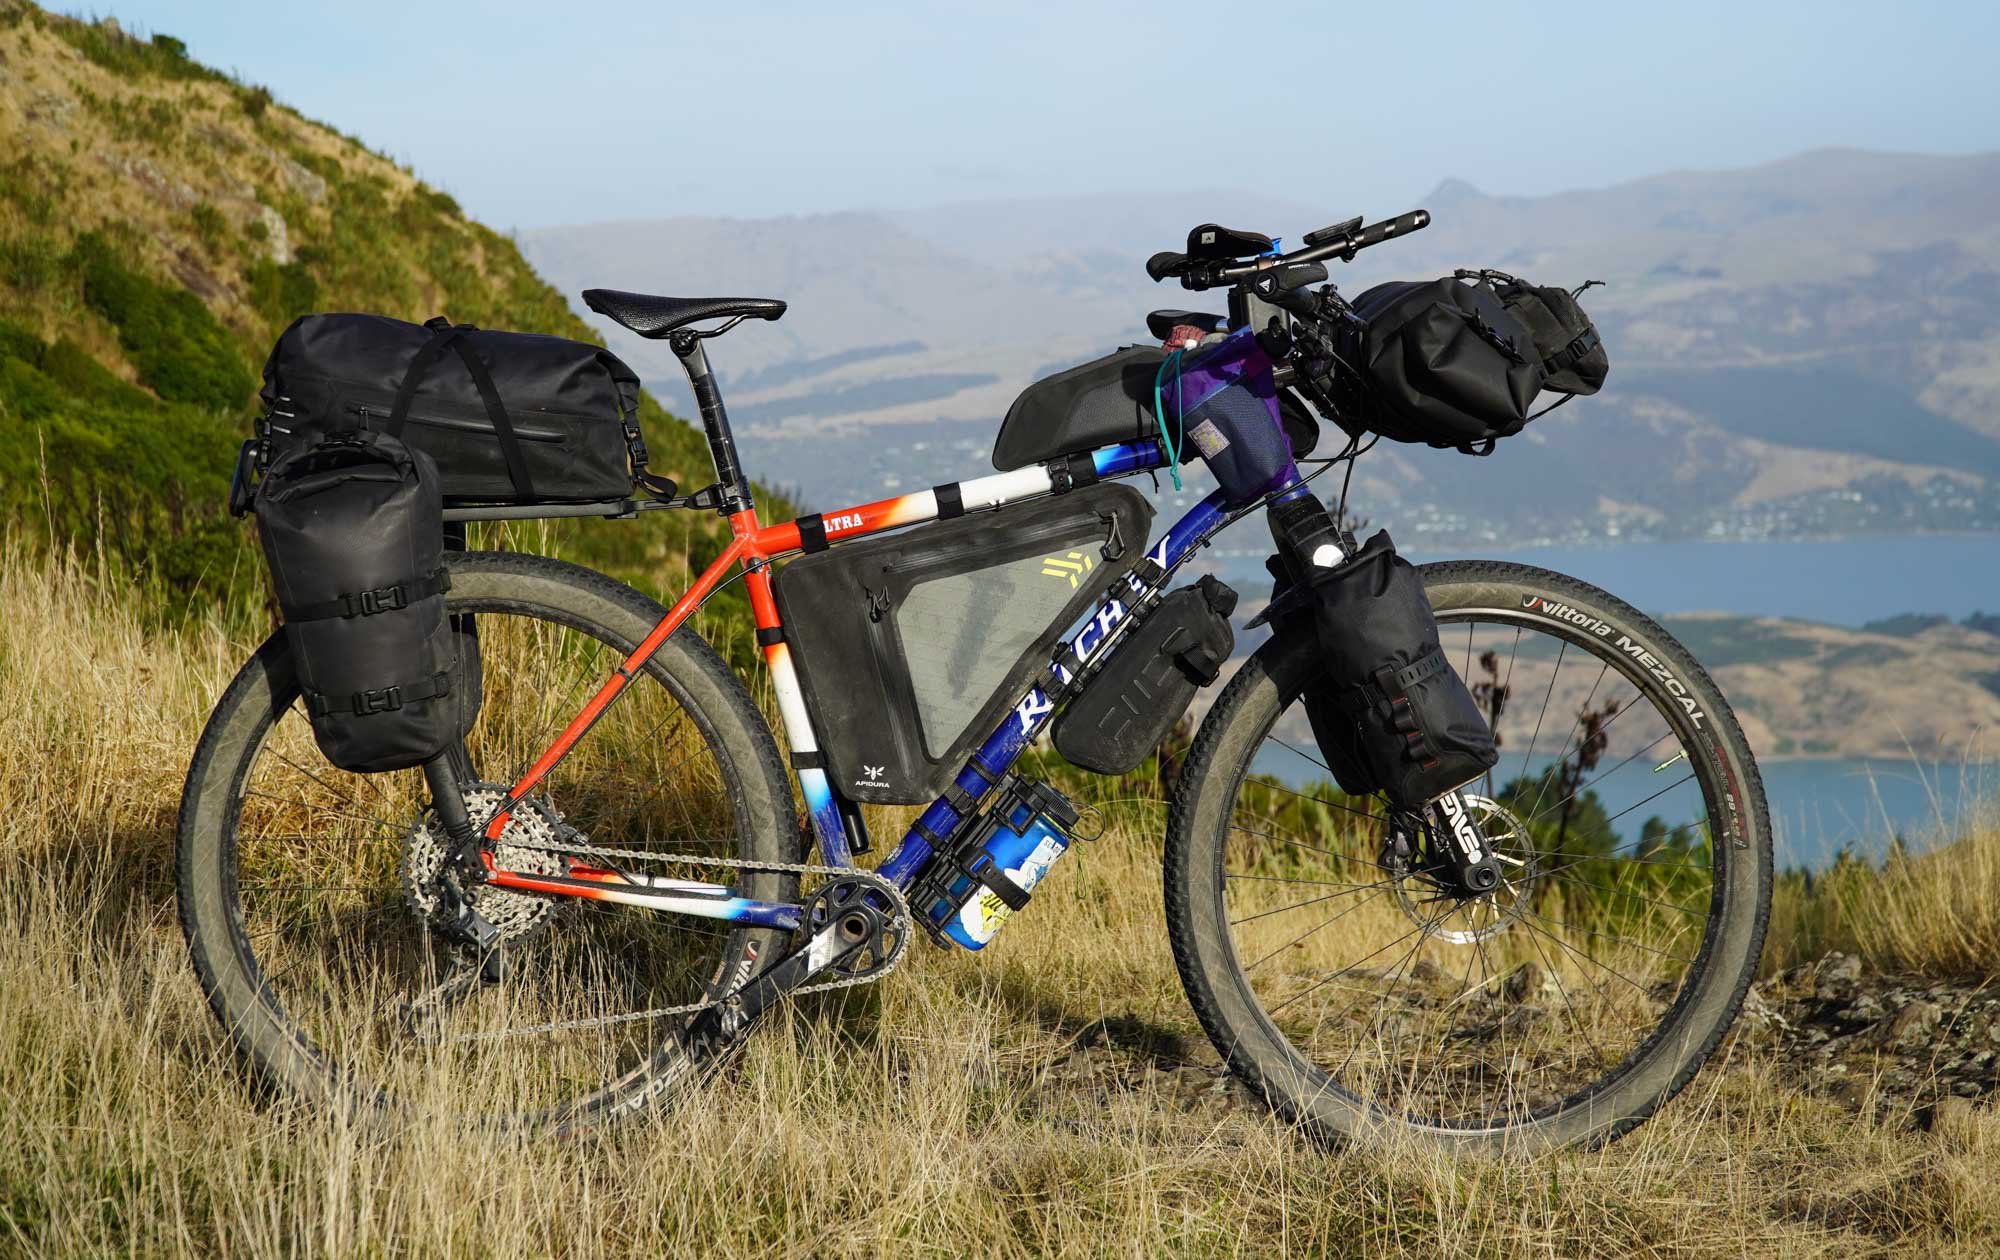
A trip to the Coromandel for a bikepacking mission over the Matariki long weekend offered up a spicy option. My friend Logan said that Cyco (the shop he worked in at the time) had a couple of Ritchey Ultra hardtail mountain bike frames floating around, and possibly even an Enve rigid fork. Even though it lacked dedicated mounts for racks or additional bottles, once I laid eyes on the famous tri-colour paint job, I was sold. Not much more needs to be said about Ritchey frames.

I initially debated a rigid versus suspension fork, but the decision was made for me with that Enve fork. Ever since Niner started bringing out bikes with their rigid carbon fork, I was desperate to get my hands on one. The Enve fork is a pretty close match, albeit lacking the aggressively squared-off uppers of the Niner fork . Crucially, it had bottle mounts on the legs and looked rad. Sold.
The frame included a Ritchey headset. Striving for a perfect build would have seen a Chris King headset swapped in, but the pragmatist in me knew the Ritchey one would be fine, and I should run it until it gave up the ghost. After all, there would be plenty of time to spend pesos further along in the build.
I did some homework and eventually found a frame wrap available in New Zealand, and spent far too long wrapping the frame and fork. Some cosmetic damage was inevitable, but I figured I might as well try and postpone it as long as possible. As you’ll see from the photos, the wrapping effort is very much a ‘learned on the job’ kind of operation, but it did what it was supposed to. I also popped some reflective tape on various parts of the frame and fork for extra visibility.

Rush to get rolling
Once the frame was on the way down from Auckland, I got hot under the collar and started scrambling to buy enough components to get me rolling.
I rushed into buying wheels. I was scouring the secondhand and new markets, knowing that I wanted something fairly strong, with bulletproof hubs and a Microspline freehub body. While the eventual WTB KOM i30 Light/DT 350 combo I ended up with is perfectly serviceable, I passed up a White Industries hub laced to a DT 511 rim because I couldn’t find a matching front wheel. I suspect I’ll regret that one down the line. The wheels I settled on have proven impressively reliable after many loaded kilometers, and no surprise that the hubs haven’t caused issues.
Unexpectedly, Vittoria’s Mezcals were a simple choice of tyre. Looking through galleries of the Tour Divide and other bikepacking races, it appears they are becoming the tyre of choice as they’re fairly fast rolling and surprisingly durable. However, the size was a subject of great debate, and the sky was the limit with room for a 2.4" out back and 3.0" between the fork legs. While I didn’t know exactly what kind of terrain I’d be riding, I was pretty sure there would be enough tarmac in there to benefit from the narrower-but-still-wide 2.25" size (in the trail variation).

Tyre inserts were a harder call, but eventually, a good deal on a set of Cushcore XCs forced my hand. In hindsight, I was happy with my decision as I didn’t get a single flat in the roughly 5,000 kilometres I rode (which still blows my mind). Plus, the additional sidewall support under the fully loaded bike was well worth it.
Cranking out the kilometers
When it came to shifting, all I knew was that it had to be Shimano. Don’t @ me, I’m just not that into SRAM drivetrains.
First things first: 1x or 2x? Front derailleurs have gone well out of fashion on mountain bikes for good reason, but they’ve also hung around on road and touring bikes for good reason. I liked the idea of the smaller jumps between gears, but there’s more to go wrong with front shifting: The front derailleur gathers mud like there’s no tomorrow, it adds another cable to your bars, and most importantly, I’ve always been rubbish at fine-tuning them (we’ve all got a weak spot).
Eventually, I settled on 1x, but then the question was: What speed? I was sold on the entire new Deore 6000 range, but the choice of 11-speed (HG freehub body) or 12-speed (Microspline) was the big question. Part of the difficulty was figuring out what spares would be more easily accessible in my travels. Even though there should in theory be fewer of the newer 12-speed chains and cassettes floating around, stock levels didn’t play by the usual rules in a post-COVID-19 era.
Soon enough 12-speed won out. To me, Microspline is a way better freehub body design (I’ve put a lot of very deep notches in aluminium HG+ freehub bodies over the years) and I had only heard good things about Hyperglide+. I had a shopping cart filled with the Deore-level cassette, shifter and rear derailleur, when a lucky find on Facebook Marketplace gave me a few nice upgrades. I ended up with a new SLX rear derailleur, Deore cassette, and XT shifter. The chain was going to be XTR (well-proven to be one of the best options for this setup. Thanks Adam Kerin of Zero Friction Cycling and Dave Rome of Escape Collective).

An unexpected issue was the I-Spec II shifter (designed to attach directly to Shimano’s newer mountain bike brake levers). I love most things Shimano, and the double downshift on the XT is a great feature, but the entire I-Spec debacle has been, well, a debacle. In the first instance it wasn’t going to work with my first choice of brakes, so I grabbed a fairly cheap band-mount XT shifter, sold the I-spec II one, then promptly wished I hadn’t.
Choosing cranks was tough. As all bike connoisseurs know, cranks can really make or break a good build. Visually they tie a bike together, and I’d argue they’re the heart of a carefully curated bike build. A set of XTR cranks would look fantastic in all their shiny glory – sadly they’re also expensive and rarely surface at secondhand prices. I looked at other options but soon ran into the difficulties of sourcing a chainring for an older set of cranks. Through my search, it did ram home that SRAM might be a good option given the ease of finding replacement chainrings.
Like many before me, I began diving into forums to check out how other people had got on mixing drivetrain components. The proposed compatibility between 12-speed Shimano chains and SRAM chainrings was mixed (I did look at the Wolf Tooth chainring designed specifically for this, but I was looking to save money with several SRAM chainrings lying around). It sounded like it worked for enough people and so I gave it a crack.

A SRAM XO crankset with a Hope bottom bracket popped up for sale. A note for anyone thinking of matching a steel SRAM chainring with a Shimano chain – no issues at all for me with a Molten Speed Wax-treated chain, but there is a tiny bit of noise when using an oil-based lubricant like the Silca Synergetic I settled on. Unfortunately, the crockpot didn’t quite fit in my frame bag.
Reign it in
Long story, but I’ve got a chronically injured hand, meaning that I’ve become more than picky with brakes (as you’ll have gathered by now, I’m pretty relaxed about other aspects of my setup). Over the last 15 years I’ve run a lot of brakes, but I’d never tried Hopes, that was until I found a screaming deal on a set of Hope 3E4s. They were ticking most of my boxes, with four pistons, proven longevity, and sweet braided metal hoses. Unfortunately, they didn’t prove to be a match made in heaven. The lever shape wasn’t working for me and ultimately I was underwhelmed in terms of power. With 180 mm rotors being the biggest I could get on each end, they just didn’t feel grunty enough even with an unladen bike.
I have always got on with Shimano brakes (perhaps because I’ve never run into the wandering bite point issue). When my flatmate bought a sweet Giant XTC build with the latest 6100 series brakes, I gave them one squeeze and knew I wanted them. The incredibly solid bite point and direct lever feel just felt right for this bike. I wasn’t entirely convinced that two pistons would be enough, but a number of friends told me I was being ridiculous and they’d be fine. For the record, I was right, and had some issues with overheating brakes on some super steep descents in Switzerland when fully loaded. With Shimano brakes I could have run the original XT I-Spec II shifter after all, but in the end, the extra adjustability of the band clamp shifter proved to give me more position options.

Stock metallic pads (with a spare set packed), and mixed bag of SRAM Centerline and Shimano IceTech 180 mm rotors rounded out the slow-down part of the package. I would have preferred 200 mm rotors, but the frame and fork decided otherwise.
During the various stages of the build, where the bike was fully built and stripped back to the frame a couple of times, I became fully acquainted with the not-particularly-well-thought-out design of the Ritchey cable routing. Running the "stock" routing for the rear brake and derailleur along the top tube and down the seatstays wasn’t great, and the funky angle of entry for the brake wasn’t a vibe. Running them along the down tube and the chainstays looked a whole lot better, but I ran into issues with the loop of the shift cable interfering with my Tailfin rear rack, and so I ended up with asymmetrical routing when I ran that back along the top tube and seatstay. Looks a bit funky, but it has worked well.

In for the long haul
When it came to the finishing kit, some selections were a whole lot easier than others.
For instance, there was only one answer to the question of pedals: Shimano XT. Well used, fairly beaten, still bulletproof – job done.

Between a fully laden bike, a distinct lack of interest in any more servicing than necessary, and no suspension at either end, I decided a dropper post was going to be superfluous for this build. I’ve always been a sucker for a nice carbon seatpost, and a super cheap Specialized S-Works post was an easy win. Cheers to the somewhat niche 30.9 seat tube diameter for that being on a massive discount.
Picking the right saddle was tough. I made things difficult for myself right off the bat by deciding that I didn’t want a Brooks (I’m not too proud to admit it was mostly on aesthetic grounds). Making things additionally complicated was deciding that, ideally, I wanted a saddle that I could go chamois-less on most of the time, as logistically washing and drying bibs on the road would be tricky. I tested every saddle I owned (a fair number) and the Specialized Power unsurprisingly ended up being the frontrunner, however the standard padding was a bit too firm.
I’m sure you can see where this is going, and unfortunately for my wallet I knew it too. I tried the Mimic and Elaston variants hoping they would do the trick, but after a test ride on the Power Mirror Expert I knew that expensive 3D-printed padding was just right. I can confirm that it is the real deal, and I managed to pedal for months without a chamois with only the occasional day in minimally padded liner shorts.
Handlebars were also tricky. I played around with a number of bars in various different combinations of material, rise, and sweep, trying to get something that worked well. Further complicating the matter was that the previous owner of my fork had chopped the steerer tube moderately short (something I fully admit to doing with most of my bikes).
I played around with the novel Passchier bamboo bars, and while I really enjoyed the compliance, I missed the direct steering of a more conventional bar. Also, I may have broken the loaner set (sorry Goat Cycles, you’re the best). For anyone who is considering these bars, from everything I can tell, I experienced the same failure as two other people online . Passchier have updated their layup process and I haven’t been able to find any reported failures with the new layup.

Further experimentation with a few borrowed bars led me to the Soma Dream Riser. It had heaps of rise and a ton of sweep for that all-day comfort, it was nicely bombproof in alloy, and was not terribly priced given its niche status. With all that backsweep I needed a longer stem, and a 70 mm FSA SL-K in silver to match the bars was a good fit. As I was running a Fred Bar (basically a mini handlebar mounted to a steerer spacer) to free up handlebar real estate and give my aero bars some more height, I had to source a low-stack headset cover to fit everything on the steerer tube, but it all came together nicely in the end.
Multiple hand positions were the name of the game, so Profile Design aerobars with absurd-looking 70 mm risers put me in a super comfy position I could hang out in all day. By the end of the trip I could assemble and consume a ham and cheese baguette from the comfort of these aerobars (assuming a lack of traffic lights or stop signs).

Ergon grips dominate the flat-bar touring bike world for a reason. I have raced with the venerable ESI silicon grips in the past and loved them, but the broad wing of the Ergon GP3s gave me a great primary position, while the integrated bar ends gave me a chance to reminisce about my first XC race bike (complete with snagging undergrowth). With a fully loaded bike the leverage from a 800 mm bar and bar ends out of the saddle was glorious.
And the rest
Going into depth about my thought process on the bags I chose would require a couple more thousand words. Out back, I ran the Tailfin rack, 20L trunk bag, and 10L panniers. Apidura's 6L full frame bag and 13L backpack added extra capacity. Revelate's Polecat drybags were secured with Blackburn Outpost Cargo cages, and feed bags were from Blue Lug Cycles and Blackburn. Aeroe's Spider handlebar cradle and 11L drybag with a Rapha bar bag rounded out the up-front storage. In short, the bags worked fantastically, but I wish I had arranged to get a full-size custom frame bag made to maximise space inside the front triangle.
Many nasty nights out in the backcountry have taught me the value of a bidon that can be filled with boiling water and used as a hot water bottle. The outcome of those lessons was that I wanted a one-litre Nalgene. This meant an alternative cage of some kind, and a Topeak Versacage actually worked far better than I expected it to (although I did use all three clamps for some redundancy).

Tools-wise, I had a OneUp pump with EDC multi-tool for day-to-day use, and a few more supplementary tools in my repair kit for anything more detailed. Anecdotally, Knog products don’t have the best reputation as far as reliability goes, but the Knog Scout seemed like a smart option and I wanted an Airtag on the bike, so I popped one behind the framebag.
A Spurcycle bell was fitted to make sure people knew I coming. A variety of lights, Magene’s Garmin Varia ripoff, and a Garmin 520 Plus GPS head unit rounded out my accessories. Most importantly (and not pictured, sorry), was the little yellow rubber duck my Mum gave me. His name is Blue.

Sometimes things go so well, until they don’t
No build is perfect, but for most of my trip, everything went smoothly. I found that Apidura’s definition of "waterproof" doesn’t align with mine, a 30-tooth chainring was pretty small for the flats but only just enough for some massive Alpine passes, and anyone who tells you there is a limit to the amount of Haribos that can be consumed is just wrong.
I was lucky enough to ride in Japan, through massive sprawling cities and axle-deep water in some of the heaviest rain of my life. I rode some of the gigantic climbs in the Alps, endless fields in northern France, stunning rolling hills in Tuscany, and narrow British lanes. I made some new friends along the way (including meeting Escape's Caley, Jonny, and Iain in the much-maligned Clermont-Ferrand), linked up with some old friends to ride together for a time, and got lonely in the apparently empty interior of France. I never named the Ritchey (not really my style), but we became great mates during our long miles on the road.
It all came to an apparent end in Glasgow during the UCI World Championships. I was in Fort William to watch some of the downhill mountain biking, and saw the Kiwi junior women go 1–2–3 (shout out Erice, Poppy, and Sacha! You legends).
After some logistical issues, some friends and I were forced to leave our bikes locked up in the Glasgow Queen Street Station secure bike room for about 36 hours. It had CCTV, was locked overnight, and was in one of the busiest areas in town . Local friends told us it was as safe as anywhere.
I’d never had a bike stolen before. I was in denial for a while, convinced that the station staff must have moved them for sitting too long. Not sure what I was thinking there. We talked to all the station staff we could find, and then the police, and it looked like we were out of luck.
The trouble with bikepacking without a bike is, well, it’s just packing. I was stuck in Glasgow with a bunch of bags that were very awkward to carry when not strapped to a bike, and no easy way to get rolling again. This article is about that Ritchey, and so to cut a long story short, I eventually tracked down a second-hand gravel bike, went to Edinburgh Fringe Festival for a few days to put the whole thing behind me, and then (about four pints deep one afternoon) got an email from the police with a photo of my bike attached asking to confirm it was mine.
Extremely relieved but very confused, I got on the train to Glasgow first thing in the morning. Again to cut a long story short, when the police viewed the CCTV footage they discovered a group had tried to steal all the bikes in the shed, but dropped mine on the way out (probably as it was awkward to carry and the Knog Scout alarm was blaring). A member of the public had then handed it into lost property at the station, where it had been ever since (despite us asking if a bike had been handed in). I retrieved the bike very relieved, discovered that besides the broken lock it was fine, and started trying to figure out what to do with my now second bike.
Months later, the Ritchey returned home to New Zealand, a little beaten but largely unscathed. I built it up with flat bars, flipped the stem, and was racing it at a local six-hour mountain bike event a few days later. A few changes and weeks later and I joined a motley crew of friends (including fellow Escape Collective member Tilly Reynolds) to ride the A20 trail in a day.
Then I rebuilt it into its bikepacking mode to take photos for this article, and now I find myself pondering where to take it next. The Ultra lives!
Gallery


Did we do a good job with this story?