

As what’s arguably the hardest-working component of a bicycle, the humble bicycle chain is put through hell with each pedal stroke. Every single link in a chain has six different parts: inner and outer plates, a roller bushing, and a connecting pin. So for every minute of pedaling, there are approximately 44,000 chain pieces in motion. That’s a whole lot of sliding friction and surfaces to wear!
As a chain wears, friction in the drivetrain will increase, the durable outer coatings are worn away – which only further accelerates wear – and your shifting will get sloppier. However, most critically, that chain wear impacts the other drivetrain components it touches, too.
Chain wear has always been a factor in ongoing maintenance, but today, many modern bikes are running drivetrain components that are vastly more expensive than ever before. Replacing a chain before it causes wear to the cassette and chainrings is often a more economical way to own a bike. However, modern chains have introduced modern technical nuance, and so if you’re still running the same chain wear checker from a decade ago, then chances are you’re missing a trick or two.
In this edition of Threaded, I aim to return to a topic that always raises questions: chain wear. Whether it’s a “too long, didn’t read” or just an easy shortlist, here are some key takeaways of this article:
- Replace the chain sooner than later in an expensive drivetrain. The old number was .75% elongation from a new chain, but that number is now far nearer to .5% (or even less in some cases) to ensure the cassette and chainrings can be re-used.
- Chain wear is progressive, not linear. If a chain is starting to show signs of wear, don’t ignore it.
- Not all chains have the same roller size or rate of wear, leaving traditional two-prong chain tools to give false readings. This is especially critical for those on the new SRAM 12-speed with Flat Top (or T-Type) chains.
- Drop-in tools are designed to be dropped into place with nothing more than gravity. Do not force the tool into the link.
- Chain slack, chain wax, and/or grit can all mask wear. Tension the chain when measuring it. Don’t measure a freshly waxed chain. And be sceptical if a disgustingly gritty/dirty chain measures as not worn.
- Chains rarely wear evenly. It’s good practice to measure a chain in at least three spots. Avoid measuring at the quick link, which is typically harder against pin wear.
- If you just want one chain wear tool, it’s hard to go past the Park Tool CC-4 (now 4.2) or Abbey Bike Tools LL.
Threaded
Tools and techniques for all the mechanics out there. Enter your email address to have Threaded delivered directly to your inbox!
Tools and techniques for all the mechanics out there. Get Threaded delivered directly to your inbox!
Chain wear 101
Look at your bicycle’s chain and note the path it follows. Each link follows the radius of the chainring, then onto the cassette, then through the derailleur, and back. With each articulation of a chain link, the riveted pin remains static, with the same surfaces repeatedly seeing friction. Similarly, the roller is largely held static when under load with a cog tooth.

A new chain should measure exactly half an inch (12.7 mm) between each pin, this is known as the chain pitch. As the inner plates articulate around the pin, the pin is worn thinner, and the inside bores of the inner links grow. This wear leads to play between the pieces, and when the chain is pulled under tension, its length grows. This is elongation wear, commonly called ‘chain stretch’ ‘- even though the metal itself does not (measurably) stretch.
As this length increases, the chain is no longer matched to the tooth profiles of the cogs/rings, and so it’ll roll higher on the tooth, accelerating cog wear until it eventually just skips over the top. It’s this wear and change of a chain’s pitch that causes the “hooked” shaping in worn cogs.

Such wear on the tooth profiles means that a new chain will no longer mesh with the base of each tooth, and rather sit high and out of sync where it’ll at best cause unwanted noise, and worse, will dangerously skip when you apply power. By contrast, if you replace a chain before its pitch greatly increases, you can avoid significant wear on the cassette and chainrings, and (likely) re-use them with a fresh chain.
Meanwhile, that same wear of the pin and inner links causes lateral slop. This lateral wear means the chain is effectively more floppy when you shift gear, and as a result, the shifting quality suffers.
On budget bikes it may be more economical to just ride the chain and the corresponding drivetrain components into the ground and replace it all at once when things play up (typically presents as skipping on a cog or jamming on the front chainrings). However, if your bike has Shimano 105/Deore, SRAM Apex/GX, or higher, then it’s often more economical to catch the chain wear early, replace the chain, and get two to three cycles out of the remaining components. Plus, your drivetrain will run smoother, more efficiently, and your shifting will perform better.

When exactly to replace the chain has become an area of great debate, with plenty of confusion and conflicting messages from component brands. While less common now, it used to be commonly recommended to base replacement on distance, and that’s honestly a terrible method given that even the simple variable of chain lube and chain maintenance can be the difference between the same chain model lasting anywhere between 500 and 15,000 km of use. Instead, the only good way to check for chain wear is to measure for it.
When a chain is worn
You check for chain wear by measuring the elongation (distance) between chain pins. Typically, such wear is a percentage of elongation added to the length of a new chain that has a standardised 1/2-in (12.7 mm) pitch between each pin.
What counts as a worn chain has changed in recent years as cog teeth have become thinner and more sensitive/susceptible to wear. With this, singlespeed drivetrains with a 1/8-in width chain are commonly tolerant of running a chain out to 1% wear compared to an unworn chain. On bikes with 5-9 speeds, the .75% chain wear mark is often a good point for replacing the chain where the old cogs can still be reused.

Meanwhile, that allowable wear percentage has greatly shrunk in modern drivetrains. It’s now widely agreed that .5% is the suggested replacement point for 10-13-speed chains in order to avoid excessive wear on the cassette or chainrings. Pushing past this figure makes it likely that a new chain won’t mesh perfectly with an old cassette or chainrings.
Keep in mind that there are no golden rules here. Results can vary in either direction, and are often based on how abrasive of a chain lube you use and how clean you keep it, whether you tend to use one or two cogs significantly more than others, and even your power output.
Where things get confusing is that a few manufacturers, such as SRAM, suggest replacing a chain at .8%. I’m strongly of the opinion that this is too late if you’re wanting to protect the cassette and chainring/s of significant wear, and that .5% is a far safer figure to follow. Meanwhile, Adam Kerin of lubricant test company Zero Friction Cycling believes that even .5% may be too late in relation to newer SRAM drivetrains mating Hard Chrome chains with aluminium cassette teeth (such as with the latest XX SL Transmission or SRAM Red AXS XPLR drivetrains), and here, he believes chain replacement nearer to .3% will allow the safe re-use of such terrifyingly expensive cassettes.
These sooner replacement figures of .3-.5% also play into the fact that chain wear is progressive, and not linear. Many modern chains have durable and low-friction coatings, but as those wear off, the chain is going to wear more quickly. Add in that the wear points in a chain are in repeated locations (same point on the pin and inner links) and it begins to explain why you have a progressive rate of wear. If your chain measures .3% wear at 3,000 km, it’ll be way over .6% at 6,000 km. This is just another reason why I suggest replacing newer multi-speed chains at .5% elongation (or sooner in some cases).
There’s also the lateral wear to consider. What counts as a laterally worn chain is rather subjective and can vary between chain brands and models. Currently, no chain manufacturer gives guidelines in relation to lateral wear, rather often such a thing is a “feeling” of experienced mechanics.
Free measurement methods
One quick and easy way to get a rough gauge on elongation wear is to see whether the chain lifts off the chainring.
On a brand new drivetrain, if you try to pull the chain up from the front of a chainring, you’ll notice little lift. By contrast, as a chain elongates, it can be lifted further from the chainring. There’s no exact rule here, but if you can lift the chain enough that it pulls beyond a chainring tooth, then it’s certainly time to measure it properly and get an understanding of how worn it is. Just know that this method can be somewhat problematic as a new chain on a worn chainring will also exhibit a comparable lift.


Measuring chain wear needs to reveal the elongation between the chain pins. Over the years, one popular method has been to use a ruler to measure a span of chain links from one pin to another. However, as the wear percentage numbers in modern drivetrains have effectively halved, I find it a little too tricky/fiddly/inconvenient to get a trustworthy read when you’re measuring eight links of chain and looking for a 1 mm variance (based on .5% wear over an 8-in/203.2 mm length span of chain).
Adding to those issues, a tip I learned from Jason Smith of former independent chain testing facility FrictionFacts is that chain elongation should be done under a light load that pulls those enlarged inner links and worn pins into a lengthened state. Placing a hand on the crank arm achieves this, but you’ll need that second hand in order to use a ruler correctly.
The longer the length of chain you measure, the more likely you are to accurately pick up on wear. In this sense, you can remove the chain from the bike, hang it vertically, and measure its entire length for a good level of accuracy (remembering that one full link of chain will measure one inch/25.4 mm when new). However, this in itself is arguably a lot of faff for what should be a simple task. This method also ignores the fact that chains don’t wear evenly, and so it may hide some sections of chain that have become more elongated than others – as a result, if using this method it’s advised to replace the chain nearer to a .3-.4% wear point.

Less free, but perhaps a tool you already own is a set of Vernier or digitial calipers. Aligning these from pin to pin is tricky, but you can rather use them to measure from roller to roller. This is how Campagnolo recommends measuring chain wear, instructing that its new chain should measure 132.2 mm across a span of six links. It recommends replacement when this figure reaches 132.6 mm, or a fairly conservative .3% wear. The same technique can be applied to other brands of chain, although given variances in roller dimensions, I recommend getting a baseline measurement when the chain is new that can be referenced against as it wears.
Chain wear tool theory
The faff and difficulty in accurately using a ruler is why dedicated chain wear tools have become a popular cycling tool amongst professionals and enthusiasts. Whatever chain tool you decide on, like any tool, it’s important to know how to correctly use the thing.
Firstly, if you can’t remember when you bought your chain wear tool, there’s a high chance it’s measuring wear at too late of stage for modern drivetrains. This is a simple one to see, and if your chain tool only measures between .75-1% wear, then you’re missing that critical .5% wear point.
Then we get to the conversation of how a chain tool is measuring wear. The most common variants feature two prongs, which measure from the backside of one chain roller to the front side of another. These tools aren’t inherently bad, but it’s important to know that roller size and roller wear (it happens in some brands of chains, particularly cheaper ones) will have a direct impact on the measurement.


This wasn’t such a big issue in the past when common roller sizes were standardised at approximately 7.6-7.64 mm, however, SRAM changed that with its 12-speed chains which feature 7.7 mm (Eagle) and 7.9 mm (Flat Top and T-Type) rollers. That 7.7 mm figure is also seemingly applicable to Campagnolo, at least of the 11- and 12-speed chains I’ve measured. If using a two-prong chain checker, the increased roller size of a newer SRAM Flst Top chain will add .2 mm to the measurement, meaning your chain checker will only show wear at a far later point than desired.
This is where three-prong chain checkers come in. The goal of such a tool is to measure from equal sides of the rollers, and therefore greatly reduce the measurement variance that the rollers present. These tools can be a little trickier to use, often requiring the user to apply a load in a certain area of the tool, and resultingly it’s common to hear complaints related to measurement uncertainty.

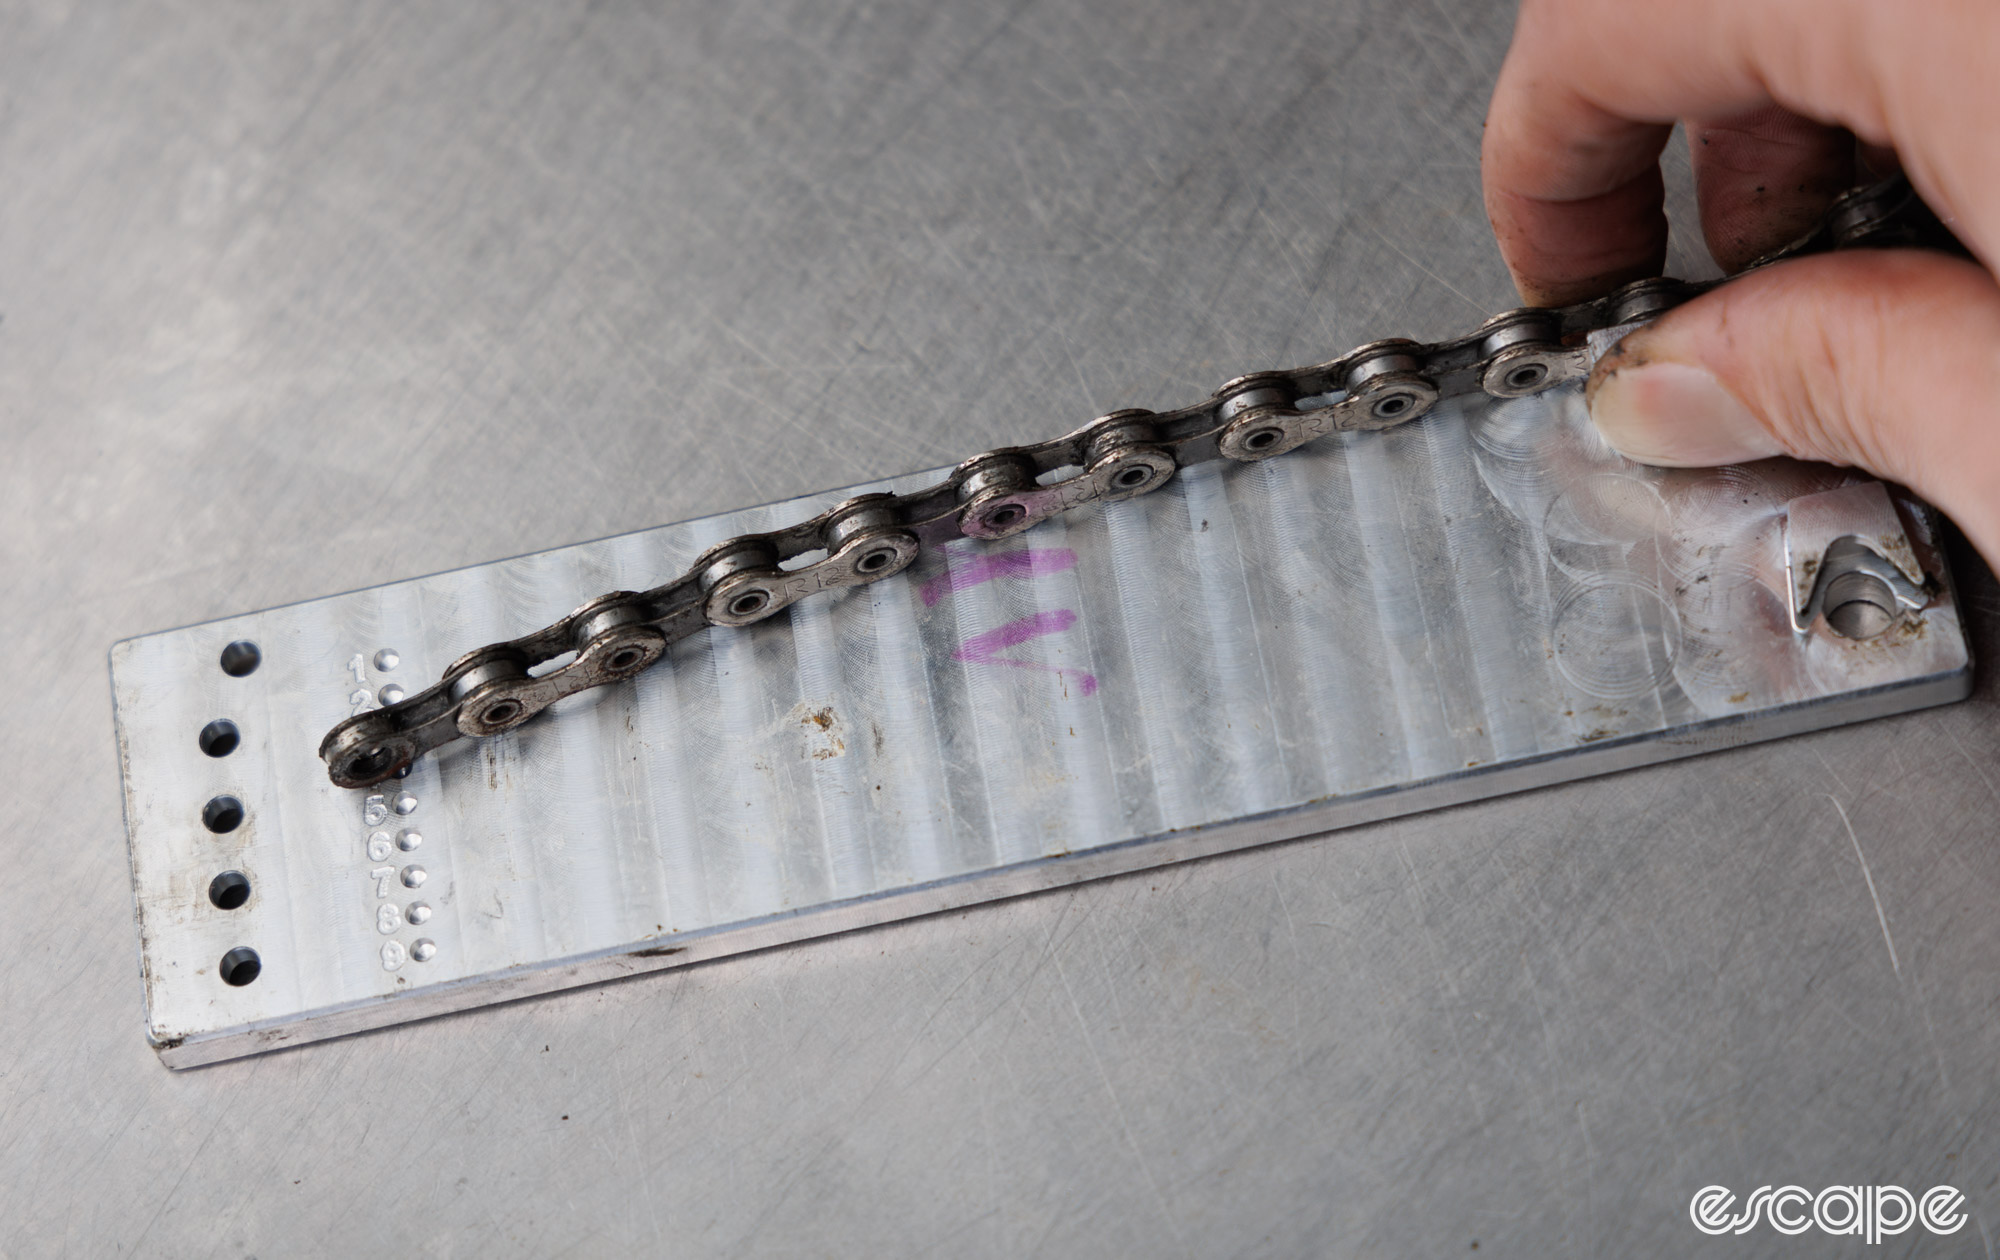
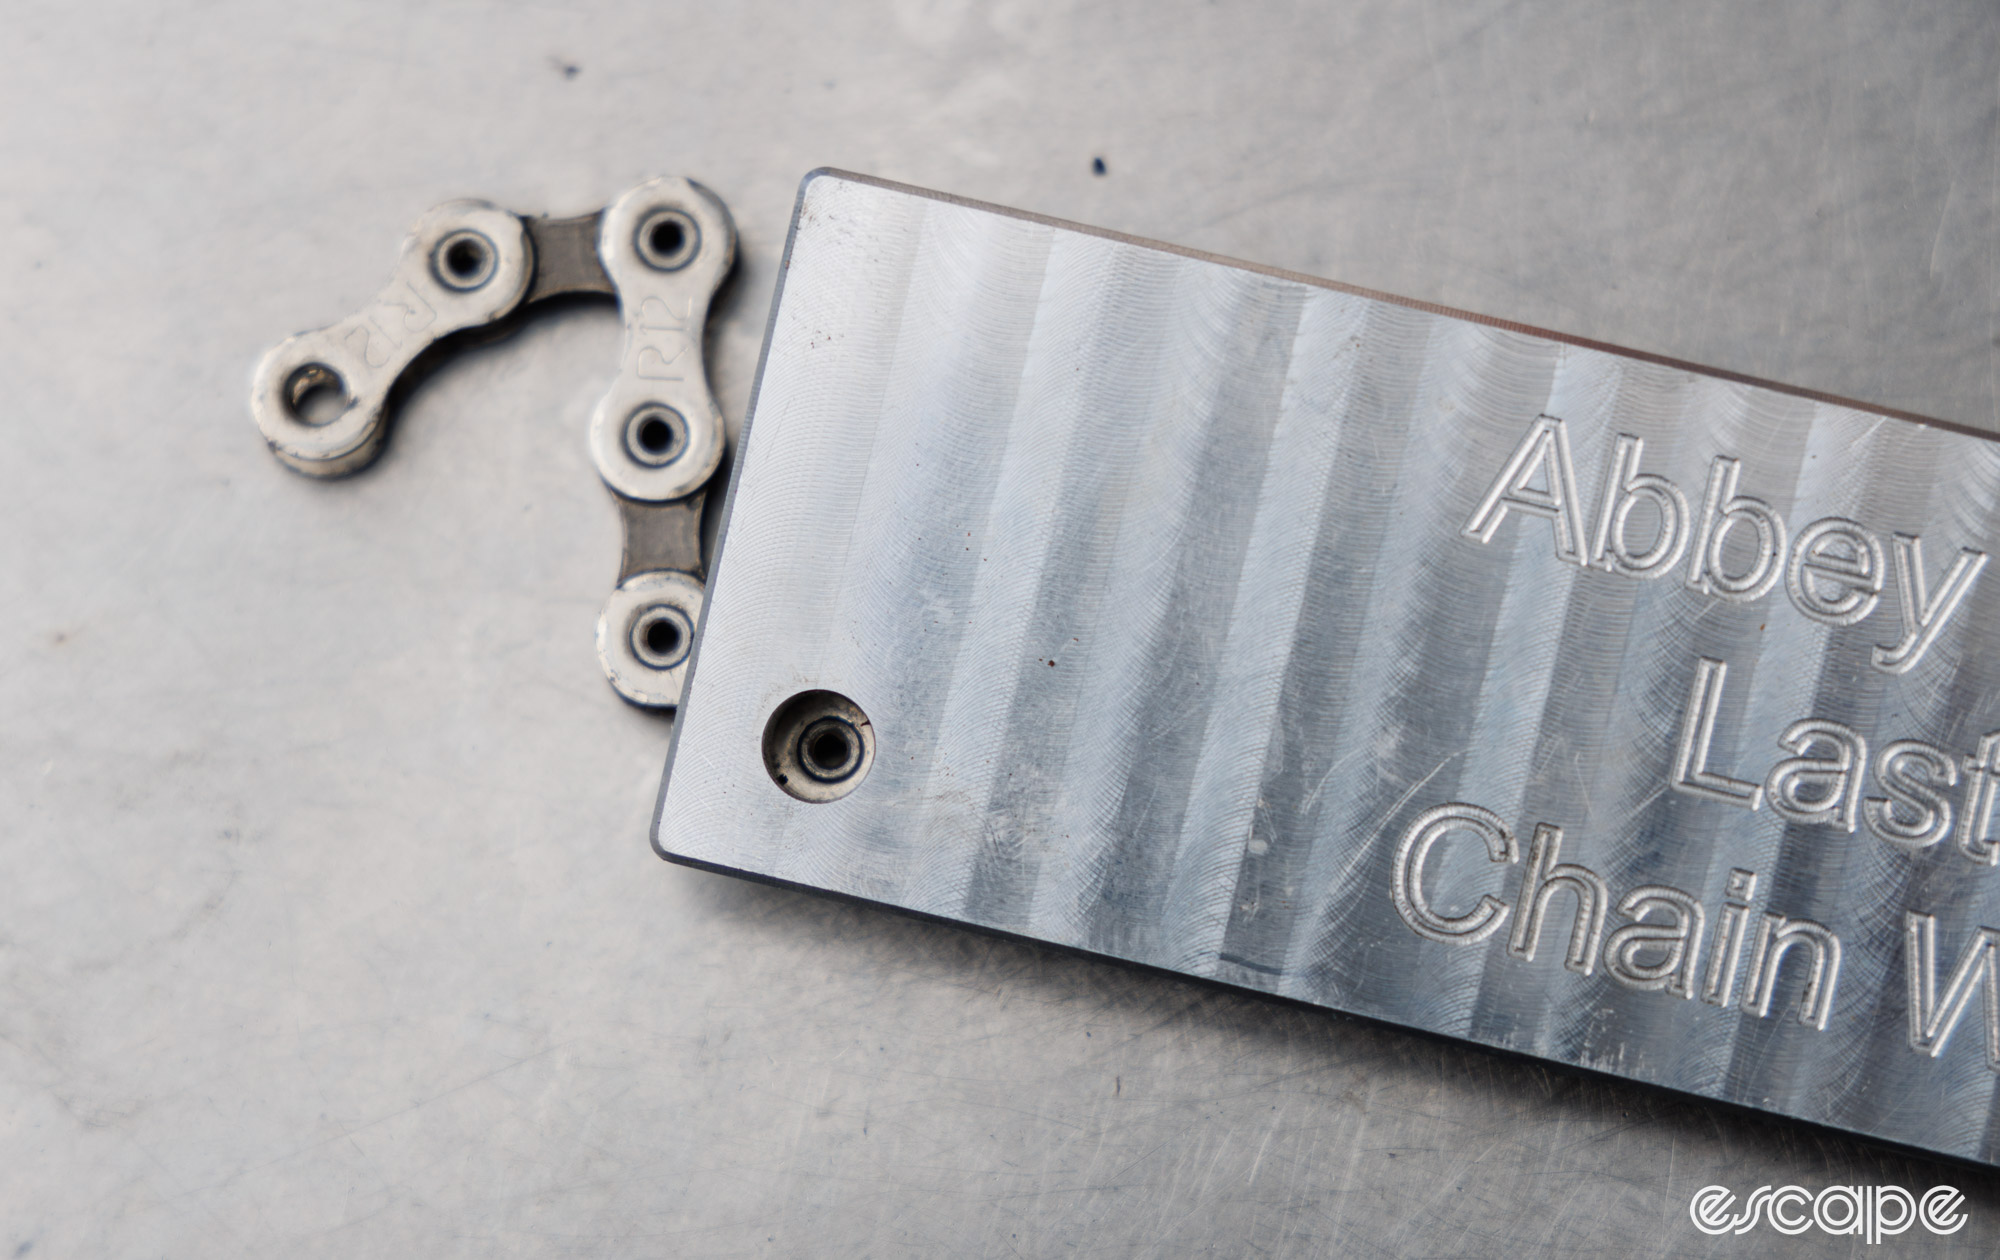
There’s also a third and fresh option, one that returns to an old theme by taking the centre line of the chain pin and then measuring off a different pin further along the chain. This one largely eliminates the rollers from the measurement and effectively achieves what a ruler aims to do – just more easily and consistently. Currently, Abbey Bike Tools owns the patent to this one.
With all of these tools needing to pick up variances as small as .1 mm, quality control can play a critical role in their effectiveness and reliability. According to Jason Quade of Abbey Bike Tools, many chainwear tools are made with methods that don’t control for the required level of sizing tolerance. This variability in quality control is factoried into the tools I recommend and is why I don’t recommend anything generic from Temu/AliExpress/etc for this category.
Similarly, the longer a chain tool is, the more opportunity it has to provide an accurate measurement. Unfortunately, a chain tool can only be so long before it’s impractical to use on the bike. There are some very good short-length chain tools, and some very good longs – it’s not a critical deciding factor.
Whatever tool type you land on, be sure to closely follow the instructions in how to use it. Many require you to gently rest the tool on top of the chain and let gravity do the rest (never force a chain tool into place!). Some three-pronged tools require you to add a load in a certain point. And others require you to gently apply pressure to a small dial. Gentle is the key trend here. Whatever you use, don’t forget to add some light tension to the chain, a step often missed in the instructions of most tool makers.

Further to this, chains rarely wear evenly and so it’s a good idea to get into the habit of using the tool at multiple points of the chain. I suggest measuring at three spots (avoiding the quick link if present), and replacing the chain if any section shows .5% wear.
Finally, beware of false results if measuring a gunky/dirty chain or one that is freshly waxed. In both cases, material will sit between the pins and inner plates, masking elongation-based wear. I’m not advocating for degreasing a chain that’s likely worn, but rather to use a gauge that offers earlier wear markers and assume greater wear than what’s measured.
What I use versus what I recommend
When it comes to chain wear tools, there is no perfect solution, each one has nuances or compromises in use. This is one of the reasons why what I choose to use and what I recommend are not necessarily the same thing. There are tools that are seemingly good for measuring all forms of chains, but I still choose to use two different tools: one for SRAM 12-speed, and another for everything else.
For everything but SRAM I like the easy use of a KMC Digital Chain Checker. This two-prong tool is spring-loaded and offers a big digital read-out, so whether the bike is in a workstand or on the ground, I can apply a load to the chain and still easily read the gauge. The digital gauge also gives me an understanding over how far along a chain is in its lifespan, and then through experience, those numbers give me more confidence in whether a new chain will mesh with a used cassette or not (there is plenty of nuance to this, and I consider brand of drivetrain, model of cassette, cleanliness, and lube choice in helping to make such a decision).

That said, I struggle to recommend the KMC Digital chain checker. It needs consistent zeroing, it doesn’t survive being dropped (I’m now onto my third, although that’s spread over a decade), it measures over a short span of chain length, and it recently had a significant jump in price (now US$125!). Plus, being a two-prong chain checker means it’s no good on SRAM 12-speed chains.
Meanwhile, for newer SRAM chains, I’ve recently taken to using the new Abbey Bike Tools LL Chain Wear Tool. By measuring off the centre of a roller and then using the pin as the wear line, it offers a reliable measurement point for all chain types and shows various stages of wear, making this one chain tool to rule them all. It has certainly had me rethink my previous recommendations. However, with my preference for tensioning the chain during measurement, I still find its use a tad cumbersome as with the bike in the workstand I need a third hand, or with the bike on the ground I need to get my eyes inline and near to the tool. For these reasons I choose to be more selective with when I use it.

Ok, so what do I recommend?
It’s not great for the sight-challenged, but the new Abbey LL Chain Wear Tool (US$45) really does solve a lot of measurement issues in other tools and will work with all chains. It provides indication of when a chain is approaching wear, such as when a chain has reached its .2.5% wear point. It also has an interesting secondary function for measuring lateral chain wear (chain off the bike) that gives a number to such a thing, although I’m still uncertain on whether the provided wear line is applicable to all models of chain.
Meanwhile, the Park Tool CC-4 (now the CC-4.2, with an added 1% wear marker), Pedro’s Chain Checker+, and Unior 1644/6 are three-prong tools that aim to reduce roller variance all while providing that all-important .5% wear marker. The Pedro’s has a few other tools built into it, while the Unior effectively copies the Pedro’s chain measuring feature. For me, the Park Tool CC-4 is the best of these as not only is it sturdier, but it measures across a 7-in length of chain versus the 5-in length of the Pedro’s/Unior. My second choice of these three is the Unior, which is sturdier and seems better toleranced than Pedro’s.


Shimano also offers a three-prong-type tool that is nicely made and worth consideration, its a simple go-no-go gauge that tends to show a chain as worn when it hits approximately .5% wear. Meanwhile, SRAM now also offers a three-pronged tool, however, I’d suggest avoiding this as it only shows wear at .8% which I wholly disagree with as an acceptable replacement point if you’re wanting to re-use a cassette.
If you never want to touch a SRAM 12/13-speed drivetrain and want a more budget option, then some of the two-prong chain tools will suffice, just be warned that not all are equal. Similarly, I struggle to suggest dial-based tools, such as the Park Tool CC-2, simply because incorrect usage can give mixed readings and even bend them, which will then cause them to show wear prematurely. One simple two-prong option I’ve come to trust over the years is the Park Tool CC-3.2 … if it drops in, your chain is worn. Simple as that. Just remember not to use it on newer 12-speed SRAM.
| Chain Tool | Measurement type | Measured Wear | Recommended? | For use with SRAM 12-speed? |
| Park Tool CC-2 | Two prong | 1% | No | No |
| Park Tool CC-3.2 | Two prong | 0.75% | Yes | No |
| Park Tool CC-4.2 | Three prong | 0.50% | Yes | Yes |
| Birzman Chain Wear Indicator II | Two prong | 0.80% | No | No |
| Cyclus Professional Chain Gauge | Two prong | 0.40% | Maybe | Maybe |
| Pedro’s Chain Checker + II | Three prong | 0.75% | Yes | Yes |
| KMC Chain Checker | Two prong | 0.80% | No | No |
| KMC Digital, old version | Two prong | .61 mm | Yes | No |
| KMC Digital, new version | Two prong | .62 mm / .65 mm* | Yes | No |
| Unior 1644/6 | Three prong | 0.50% | Yes | Yes |
| Shimano TL-CN42 | Three prong | 0.50% | Yes | Yes |
| Abbey Bike Tools LL | Chain pin | .5% (or a tad over) | Yes | Yes |
The KMC Digital has two figures as I had two to test with. These numbers are in millimeters, while the others are as a percentage, my experience has shown that the millimeters displayed by the KMC Digital units commonly correlate with the % wear (where .6 mm = .6%). The Cyclus tool has been listed as a maybe, as it offers no specific numerical values, but a keen user could reference the gauge to actual measured numbers for full compatibility usage.
Lastly, I have no qualms over suggesting the use of Vernier or digital calipers for the purpose of measuring chain wear. I personally don’t do it because the few varying roller dimensions in the market give me a few too many numbers to keep track of, but it’s certainly an option for those wanting to write down the go-no-go figures related to the chains in use.
Measuring cog wear
Broadly speaking, for 10, 11, and 12-speed drivetrain users, replacing the chain when it measures .5% wear (and not more) will allow you to reuse the existing cassette and chainrings. You should be able to get two to three chains to that one cassette, and as many as five chains to the chainrings.

How to measure for cog wear is a common question I get, and often I merely base it on the corresponding chain wear and a visual inspection. Severely worn cassettes and chainrings are easy to spot as the teeth will start looking thin and shark fin-like. The teeth will likely be burred on the edges, too. Dedicated tools do exist for measuring cog wear (such as the original from Rohloff and subsequent copies), but my experience has been rather mixed with these, and you still run into similar compatibility issues where newer SRAM 12-speed stuff is concerned.
Adam Kerin suggests measuring the gap between cog teeth to gauge wear. This is typically approximately 9.5 mm between two cog tooth tips on either a new Shimano cassette or chainring. Once this number nears 10 mm, replacement of the cassette and chainring is recommended. The difficulty here is that modern drivetrains are increasingly using asymmetrically shaped teeth to improve shifting, and so such measurements can be variable – for this reason it’s not a method I use.
If chain wear and a visual inspection leave me unsure of the cassette/chainring health, then I’ll typically install a new chain and test for unwanted noise and/or skipping. If a new chain is installed on a worn cassette, it’ll likely present with gapping issues between the teeth, it may reveal some lifting issues, and loaded testing should reveal skipping (most commonly in the smallest cogs or those made of a softer aluminium material). On multi-speed chainrings (aka, not a 1x narrow-wide), I like to grab the chain at a 3 o’clock position and pull hard. Here, a worn chainring will likely let the chain slip forward, proving just how dangerous such a combination can be. For worn narrow-wide chainrings, a new chain will likely present an unwanted rumbling noise and perhaps some snatching of the lower-span of the chain.
Never done
Who’d have thought that a .2% change in a roller dimension would cause such drama? Indeed, chain wear remains a maintenance topic of great nuance, where sometimes playing it safe is the best point of call for trusting that a chain doesn’t get too cooked and that a cassette can still be reused.
I’ve written over 30,000 words about chains in recent years and once again I’m feeling inspired to return to elements of the topic. Having started with simple chain cleaning tips, you can bet this article won’t be the last chain-related feature for Threaded.
Did we do a good job with this story?