
After a little time focused on making bikes, it’s time for another Whys of Bike Tech with Rob English. In this edition, English explores a few aspects of frame design and fabrication.
Different construction methods are available when considering a fairly conventional frame made of tubing, each with pros and cons both from a production and performance standpoint. Let’s take a look at some of the more widely used methods, focusing on metal frames.
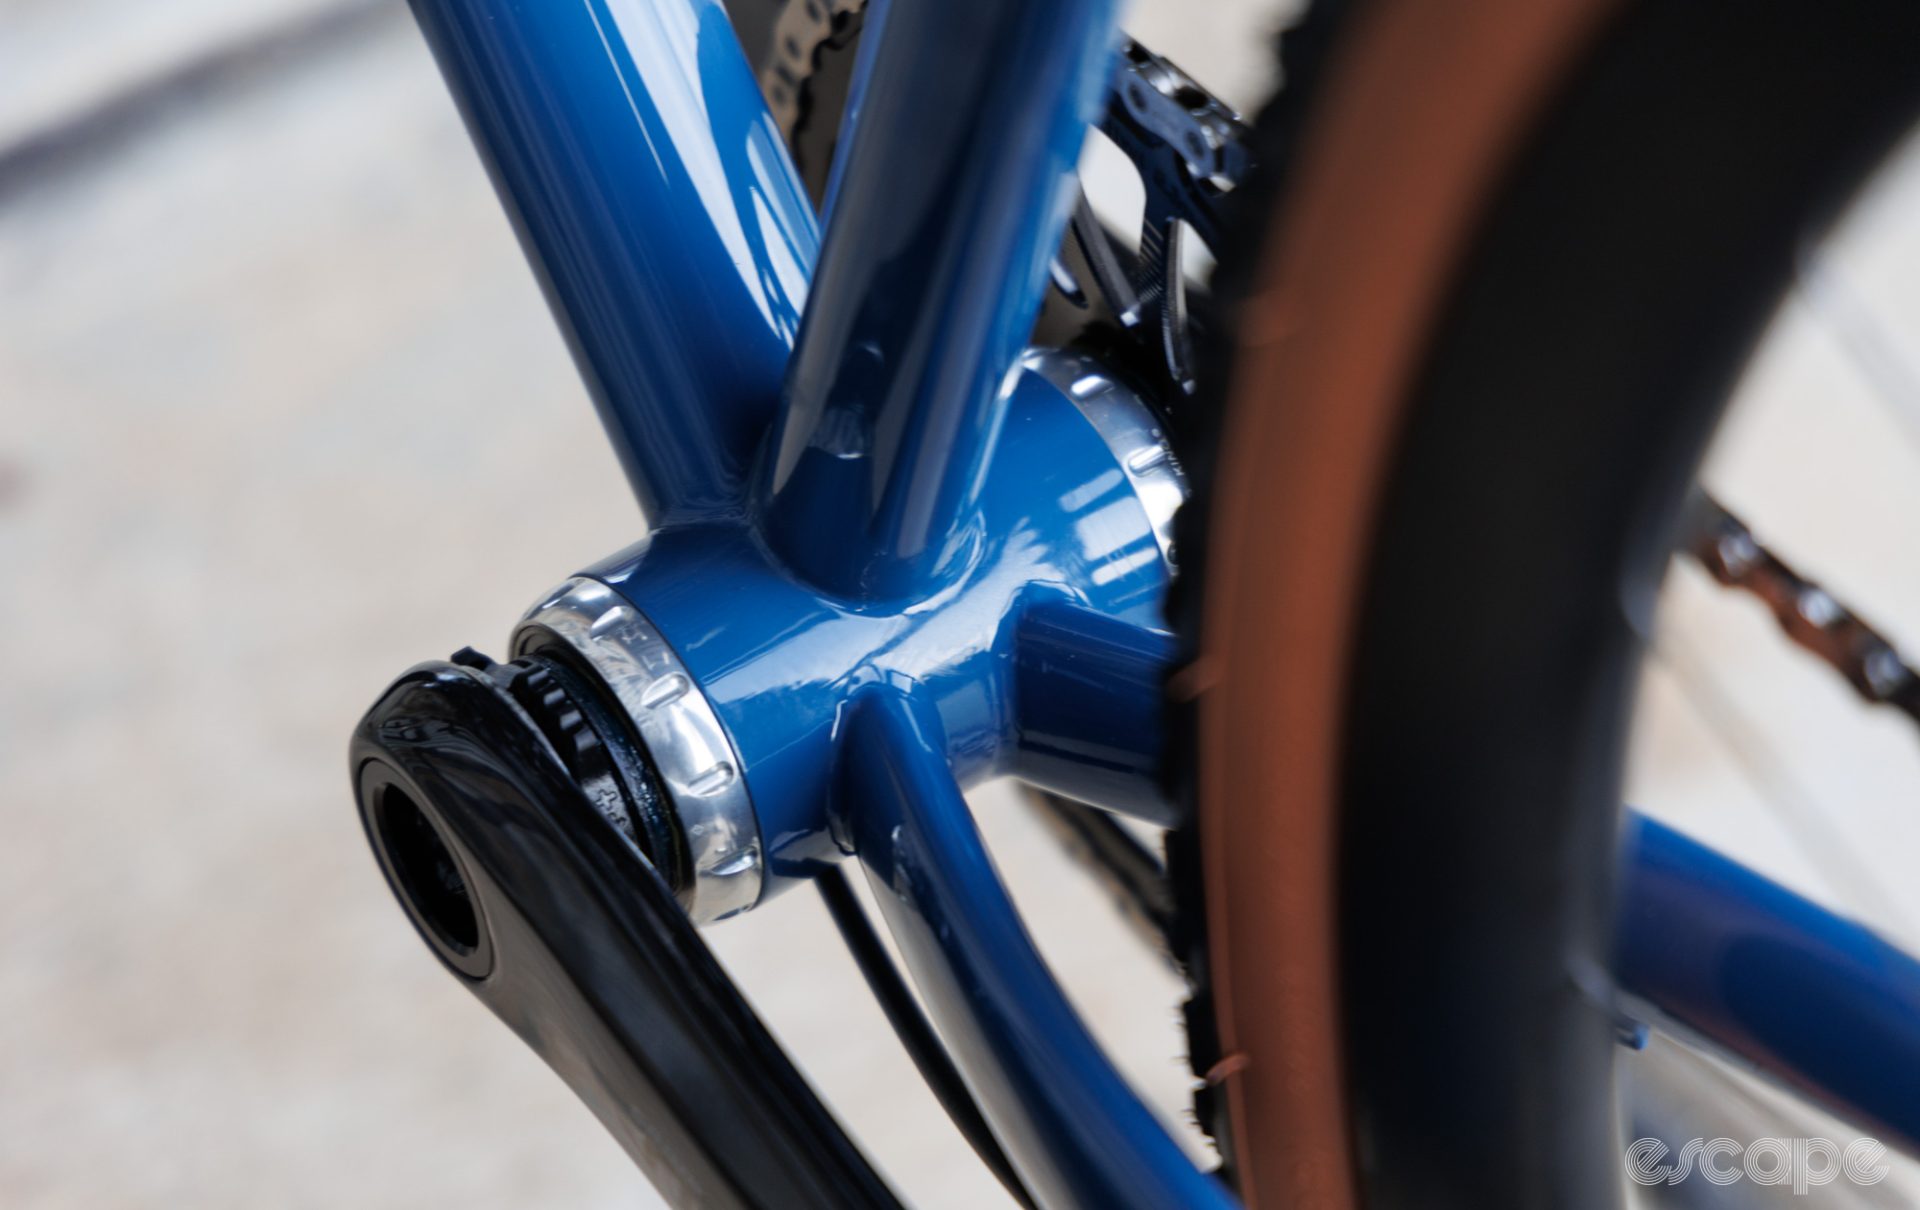
All things lugs
A lug acts as the node to join tubes, holding them at the correct angles. This can potentially increase fabrication efficiencies as the lugs effectively allow for a self-jigging frame once the tubes are cut and mitered to the correct lengths. The lug can also add strength to the joint due to the overlapping material. There's potential to include other features such as cable guides or seatpost clamps. And in some cases, the lug is used to add aesthetic or artistic flourishes.

However, because the angles are fixed by the lug design, using mass-produced lugs will limit the ability to create custom geometry. Although, it is possible to create custom lugsets by either brazing sections of tubes together, by machining (for example, Framework), or by 3D printing (for example, Bastion).
Bonding tubes into lugs is currently most commonly seen for joining disparate materials, for example, gluing carbon tubes into metal lugs. In the past, it was also used for some early aluminium alloy frames, such as by Alan and Trek, which allowed for the use of some high-strength alloys that aren’t suitable for welding.
Most of the pitfalls of bonding materials are now well understood and catered for during the gluing process. For joining similar materials, ensuring sufficient overlap and that the glue completely fills it is the main consideration.
However, when it comes to disimilar materials, there are further potential issues. Firstly, different expansion rates with temperature may need to be accounted for, potentially using a bonding agent with an amount of elasticity. Secondly, galvanic corrosion can occur – this can happen when dissimilar materials with different electrode potentials are exposed to an electrolyte. So, for example, sweat or road salt running into joints and being unable to dry out.
Good design and methodology can prevent this by ensuring there is no direct contact between the materials, instead ensuring a consistent bond spacing. A common way to ensure this is to add glass micro-spheres to the epoxy (where matching diameter to the gap tolerance is hugely important).

Where manufacturing efficiencies (mass production) were the priority, low-end steel frames used to be made with inexpensive pressed or cast steel lugs with simple tubes plugged in and brazed (sometimes with automatic brazing where fixed torches would pre-heat the lugs).
By contrast, custom frame builders can choose quality investment cast lugs (or perhaps 3D printed lugs) paired with butted tubing designed for lugged construction to maximise the performance properties of this construction method, where the lug is integral to the strength and stiffness properties of the complete frame. Ideally, a lugged frame uses tubing with thinner, shorter butts, since the lug provides extra material and strength at the joint. If this isn’t the case, then it may be that the lugs are adding unnecessary weight to the frame.
A lugged steel frame is typically joined using a silver alloy brazing rod. Silver has a lower melting temperature than bronze, and the right alloys are more fluid when melted, for good capillary action to suck into the lug and completely fill the joint. For the more traditional steel alloys used for bicycle tubing, this lower temperature maintains strength in the steel that the higher temperatures of bronze brazing, or higher still of welding, may decrease.

Some of the modern steel alloys, such as Reynolds 853 used for bicycle tubing, have been created to use the higher heat of brazing/welding to increase their strength. These are sometimes referred to as ‘air hardening’ alloys, meaning that the process of cooling in air at room temperature creates a stronger grain structure. As opposed to a more traditional alloy such as Reynolds 531, that will end up with less strength from this heating and cooling process.
While most custom framebuilders now use lugs to provide a unique artistic or traditional flair, there is still room for lugs when building a performance steel bicycle frame. Mark DiNucci is a builder with a great understanding of materials and frame design. Using his vast experience, he has designed a lugset and matching tubeset. He deliberately takes the more challenging fabrication option of brazing his lugs using bronze (and the corresponding higher temperatures) to gain the higher strength of air-hardening alloys, while the butting of the tubing takes into account the extra support of the lugs to optimize the whole structure.
Brazed and welded
Before TIG welding became common, fillet brazing a frame was also known as lug-less construction. With this technique, the mitered tubes are joined by melting a fillet of bronze or silver to effectively hot-glue the steel tubes together. The steel is heated enough that the bronze (or silver) melts and bonds to it, but below the melting temperature of the steel tube.
Fillet brazing was originally used for frame geometries that fell outside of available lug options, and it gives the builder great flexibility on the geometry plus the size and shape of the tubing. Most often, the fillets are sanded after brazing to give a smooth visual that can be aesthetically pleasing. This smooth finish is a big reason for why a number of steel frame builders choose fillet brazing over welding.

A well-shaped fillet also helps distribute the stress at the joint over a larger area, potentially leading to a stronger joint. In a production setting, brazing is typically a little slower than welding, owing to the pre-heat time required of the area before the bronze can be applied. Additionally, welding offers further production advantages due to the relative lack of clean-up and sanding time.
While there may be some very low-cost bicycles using other types of welding, TIG (Tungsten Inert Gas) welding is the primary method of constructing metal frames. Tungsten is the material used for the electrode, through which a current is passed to create an arc to the frame, which is electrically grounded. By keeping the tip of the electrode precisely held above the metal, the arc can be used to melt the tubing and fuse two tubes together.

During the process, an inert gas, typically Argon, is diffused over the electrode from a surrounding cup. This prevents oxidation or other reactions with the air and, thus, the possibility of impurities (potential weak spots) in the weld. For particularly reactive metals, such as titanium, purging the inside of the joint with an inert gas is important.
Thicker materials can be joined just by melting the parent metals. Meanwhile, thinner walls may require the use of a filler rod added to the molten pool to produce a larger and stronger joint (commonly seen with aluminium frames). Whilst the visual mark of a good weld is the neat stack-of-dimes pattern, the truth of whether the weld has structural strength is the penetration. As in, are the tubes joined all the way through? A common technique is to take two passes at the joint, a first to fuse the materials together, then a second to add filler and effectively build up a small fillet over the joint.

Whether lugged, fillet brazed, or welded, all of these fabrication methods are well-proven and can build a good frame. As is often the case, the quality of the construction and the design choices are more important than the method or material.
I primarily build with fillet brazing, and my test has always been that I want the joint to be strong enough that the tube fails before the joint does. This has been the case with performing destructive testing on sample joints. All of this is to say that if the tubing has been appropriately selected for the rider and use, then the whole structure will have the required strength.

To bridge or not to bridge
With a fabrication method chosen, and the tubing selected, there are other design options to consider. One of which is the use (or not) of chainstay and seatstay bridges. Such bridges are small sections of tubing, or sometimes a casting, that are positioned to join the stays in front of (or above) the rear tire.


A frame that will use a seatstay-mounted regular rim brake caliper automatically receives a seatstay bridge that includes the brake mounting point (or has a wishbone style seatstay where the tubes meet at the brake mount). A frame with cantilever brake studs on the seatstays will benefit from a bridge to tie the stays together to better resist being pushed apart under braking loads. Chainstay bridges have less direct function, but are often used as the lower mounting point for the rear fender. So what about a frame with disc brakes and perhaps no fenders (or mounted alternatively)? Is there a functional reason to include stay bridges on a frame?
Firstly, let me discuss the negatives of such bridges. Depending on the tire size, dropout style and derailleur, a chainstay bridge can make wheel removal more difficult if the wheel needs to move further forward for easy removal. As I'm sure others have, I've come across frames where the tire needed to be deflated to get around this clearance issue. A bridge on the chainstay can also be a place for mud to collect.
When I started building frames and considering their design, I thought about the chainstays being triangulated across the rear hub axle. To my mind, adding a bridge between the stays very close to the bottom bracket shell would be a negligible increase in the stiffness of that triangle, at the expense of a potential stress riser by adding a tube and extra heat at that point. Perhaps the bridge would make a small improvement with quick-release hubs, but the additional locking of the axle to the dropouts provided by a thru-axle seems to make the bridge unnecessary. I only have one data point of testing this, but that one test confirmed my theory: I measured the static lateral deflection at the rear dropout of a frame without a bridge, then brazed one in place and repeated the measurement – there was no discernable difference in the stiffness.
Having taken all this into account, in general, the only time I use a chainstay bridge on a custom frame is for frames with long chainstays that need a place to mount the rear fender. For everything else, I use a boss on the rear of the seat tube as the fender attachment point. An exception is with my folding frame design for travel bikes, which have a separable chainstay bridge to allow for assembling the frame after painting, and then creating a one-piece chainstay assembly.


Most of my frames use a wishbone-style seatstay design. Meanwhile, for disc brake frames with more conventional twin seatstays, not using a bridge has the potential to allow for flex that could be beneficial for comfort, as not tying the stays together above the tire could produce an outward bow under load. Plus, going bridgeless removes another location that can be susceptible to mud buildup.
In an age of disc brakes and thru-axles ruling the roost, I think bridges are becoming a legacy design choice that offer minimal benefit beyond a nod to tradition. For a deeper dive into material choices for bicycle frames, please see my article from last year.
On my mind
Recently, my brain has been busy working on a new time-trial bike design. The goal here is to continue to explore creating a performance machine by drawing on the excellent structural properties of steel. I don’t have access to CFD or windtunnel analysis, but I can approach creating an aerodynamic bicycle from basic principles.
Aerodynamic drag is represented by the term CdA, where Cd is the drag coefficient (how aerodynamically efficient the shape is), and A is the frontal area. I have had some tubing custom drawn into what should be a good low-drag shape and then I can use the high strength and stiffness of steel to build a very narrow frame to minimise the A component.
Now that I’ve written it here I will have to make sure I follow through to a complete bike!
Did we do a good job with this story?