Riding is Life
Lights

Comments

Threaded #8: A guide to sizing cartridge bearings

Tips, tricks, and tools for measuring cartridge bearings and headset bearings. Plus, breaking news from a beloved tool company! 

Dave Rome
by Dave Rome 02.02.2024 Photography by
Dave Rome
More from Dave +

A bearing is to a bicycle what a smear of peanut butter is to a P&J sandwich – you’d just be in a jam without it. Previously, I covered all the fancy and specialist tools for smoothly removing worn and crusty cartridge bearings from a bicycle, and in the next edition of Threaded I’ll finally get to the punchline with how to install those spinning rings of steel.

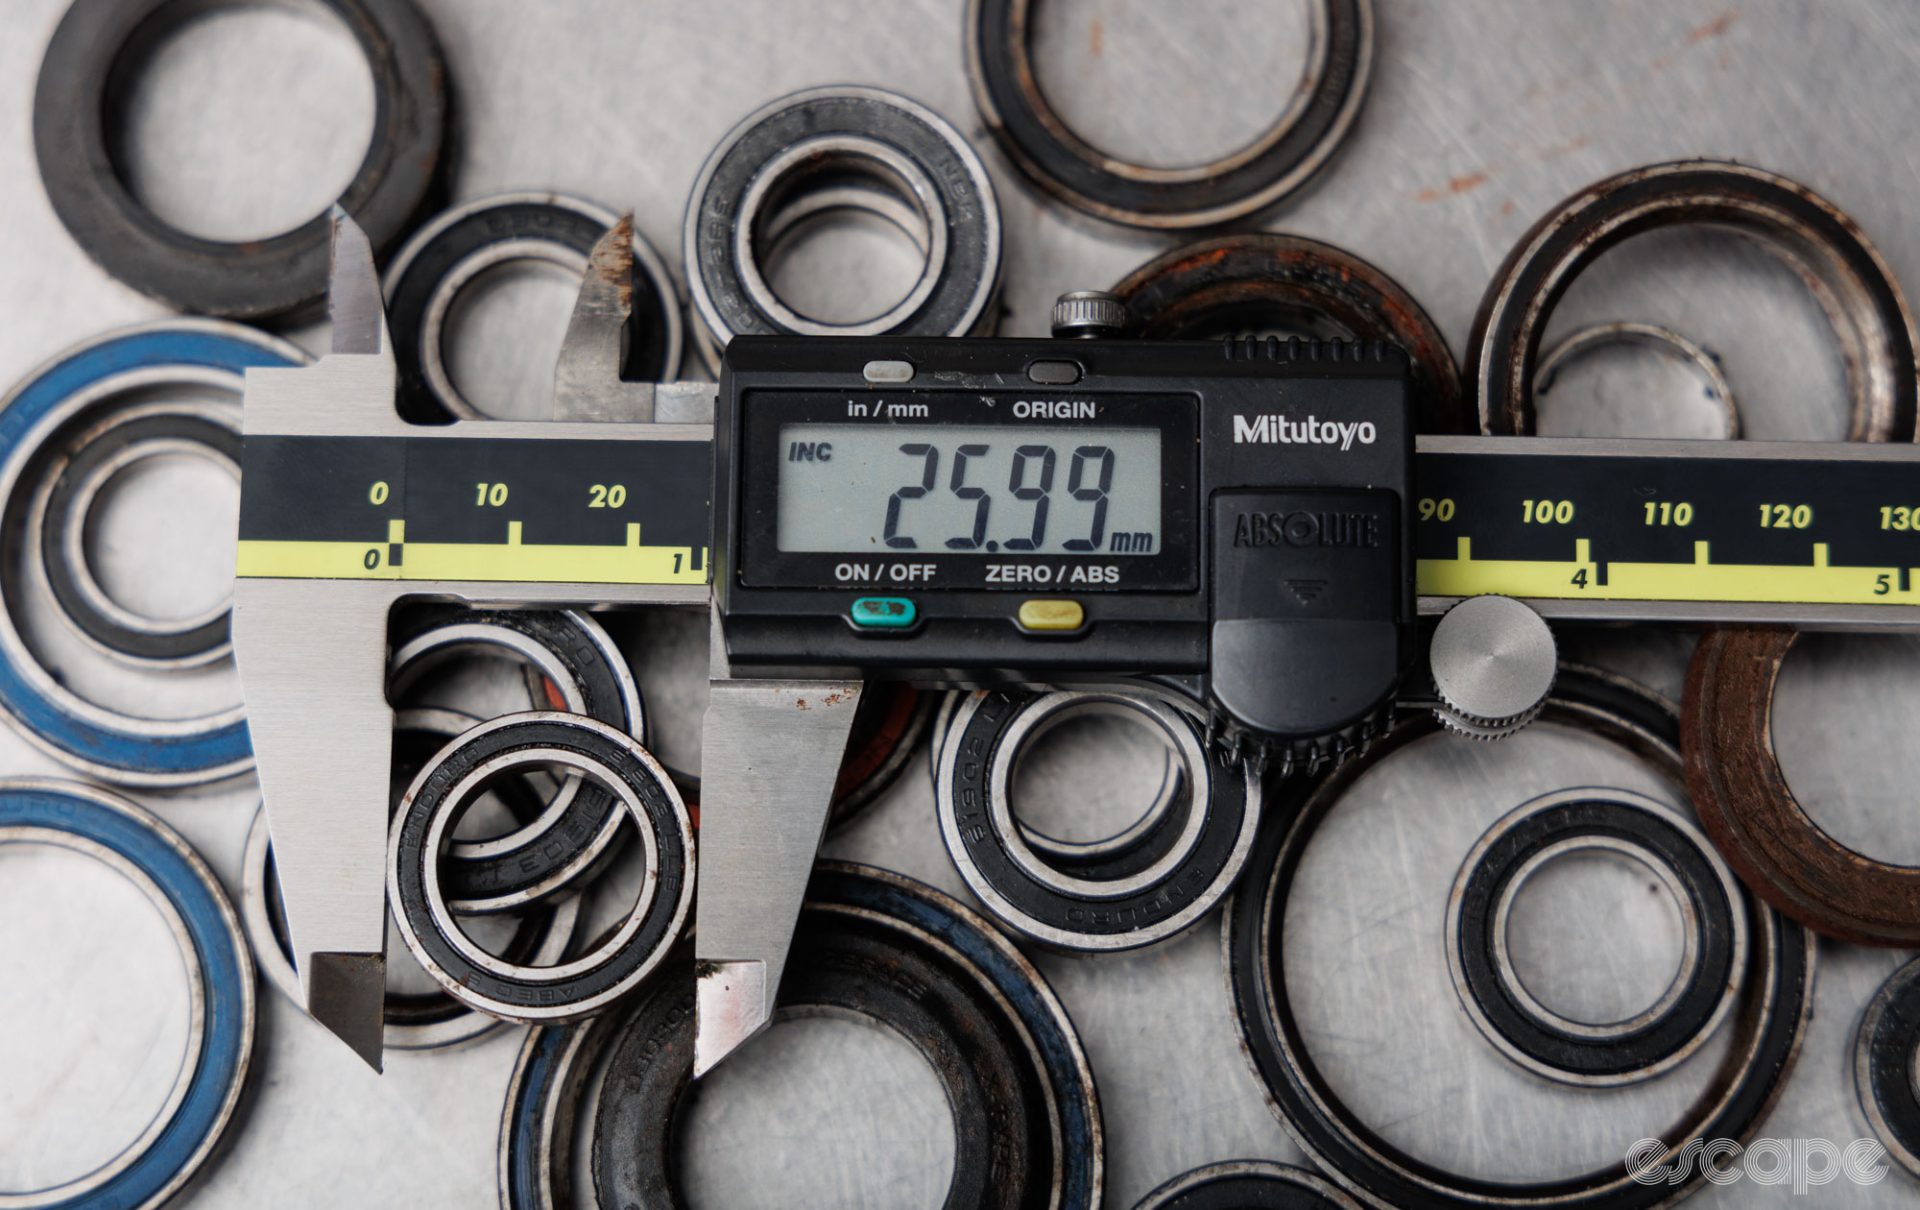
In this edition, I’ll be covering the all-important aspect of knowing what bearings you need, how to measure them, and common pitfalls to avoid. Consider this a tips-heavy and tool-lite version of Threaded. Yep, a world first!

This is part two of the Threaded series of replacing Cartridge bearings. If you haven’t already, check out part one here. Part three is also now available, covering all aspects of installing new cartridge bearings. A quick word of warning, many of the topics covered here are typically the domain of professional mechanics. If you’re yet to master derailleur tuning and wheel truing feels like witchcraft, please consider employing a professional to replace cartridge bearings. Regardless of that, I hope you find this article interesting.

Like all content on Escape Collective, Threaded is wholly funded by our members. If you haven’t already, please subscribe to the Threaded newsletter (it’s free) so you don’t miss future fortnightly geek-outs. 

Focus on cartridge bearings 

As covered previously, cartridge bearings (aka, sealed bearings or deep-groove ball bearings) have become the most common type of bearing on the modern bicycle aimed at enthusiast or performance usage. These bearings are designed to be a self-contained unit and are made up of an inner race, an outer race, the ball bearings, and in most cases, a retainer for the ball bearings and protective seals.

This article focuses solely on cartridge bearings. However, other bearing types are also commonly found. Many bikes sold today still feature cup-and-cone loose ball bearings, nylon bushings, or similar alternatives to cartridge bearings. These alternatives are often simpler to service but can introduce unique intricacies. Park Tool is a good resource for beginner guides related to other common bearing types, such as cup-and-cone hub bearings

OK, back to cartridge bearings. No standards exist for what size or type of bearing a bicycle component must use. It’s common for a single rear hub to have multiple different bearing sizes within it, or a mountain bike’s full suspension linkage to use a different size at every pivot location. And then, just as a gotcha, occasionally you’ll find custom-sized bearings that may be doubled in width, have a different inner diameter, or an extended inner race. Needless to say, it’s a topic that deserves a dedicated article (like this one!).

Adding to the stress, there are instances where the bearing codes printed don’t correlate with the actual size, or more commonly, those codes are no longer legible due to corrosion and abrasion. And it’s here that I hope the lessons of this article are most helpful. 

A rusty headset bearing sits on top of a bench vise.
It’s not uncommon for a bearing to come out of a bike looking like this. This article will guide you through figuring out the right size.

Researching and reading bearing numbers

In case you didn’t know, the Wide World Web has become a fantastic resource for accessing information. More than ever before, manufacturers are uploading dealer manuals, product diagrams, or schematics of their products for you to locate required product numbers needed for service. The best examples don’t just give you the manufacturer’s part number for an otherwise standard bearing but rather the required bearing dimensions or bearing type. 

However, there are also times when a manufacturer has decided to keep such information exclusively for its dealer network (hate this, #righttorepair!) or perhaps considers a bearing-based component to be non-serviceable (commonly seen with freehub bodies, pedals, and some headset cups). In these cases, it’s normal for a mechanic to dissemble a component to determine what replacement cartridge bearing is required. 

In my experience, crawling through forum threads or YouTube for answers on bearing sizes can be a huge time suck with questionable results. Rather, I always try to go to the source. My standard method is to Google for “Brand x Model x Schematics” (or “dealer manual”, or “exploded view”). For extra efficiency, you can also add “.pdf” to your Google search to prioritise results for official PDF documents; sometimes, these will be from the brand or at other times, you may locate bootleg copies intended for dealers only. Here’s an example

A screenshot of bearing sizes taken from a Specialized Turbo Levo user manual.
Specialized’s user manuals often have all the right info. Pictured is a page from the 2023 Turbo Levo manual, which provides all necessary information related to required bearings. Kudos to Specialized for making these publicly accessible.

Some brands do a stellar job of such manuals and information, with props to the likes of Specialized, Ibis, Orbea, Hope, Wolf Tooth, and others for being super transparent on such info. Meanwhile, brands like Trek and Canyon will often tell you their specific product number for a bearing, but typing that into their respective website will then give you the exact dimensions to replicate – an extra step, but the information is there if you know where to look. 

If you’re reading such product manuals, watch out for brands that claim to use bearings in a size that is a hair away from a whole number. So for example, if a hub claims to need a bearing with a 16.99 mm outer diameter, then chances are they’re trying to sell you their own bearing when in fact a 17 mm outer diameter bearing is the same thing.

More often than not, mechanics still need to open up the part in order to read the bearing code that is commonly moulded on the rubber bearing shield, or in some cases, it’s laser etched onto the side of the bearing (common for headset bearings). 

While good lighting or even a torch can help, it can still be extremely difficult to read these codes on a small bicycle bearing. One useful trick is to photograph the bearing code with your smartphone under good lighting. Modern smartphone cameras can do macro photography well and grab the number your eyes can’t. 

A smartphone taking a picture of an installed bicycle hub bearing that is otherwise hard to read.
Your smartphone can be a handy tool for reading bearing codes.

Reading the bearing code or sourcing such codes from the manufacturer is often a safe bet, but there is still some risk. For example, “the 6903 or 61903 size is a common one, where some front hubs will have a non-standard 18 mm internal diameter (making it a 18307 bearing), whereas a 6903 should be 17 mm,” said Duncan Miller of Australian bicycle bearing specialist wholesaler, DIY-MTB

When in doubt, it’s time to take some measurements yourself. It is sometimes possible to do this with the bearing still pressed into its bore, but often, you’ll avoid ordering the wrong thing if the bearing is first removed. 

Measuring regular cartridge bearings 

So let’s assume you have the old bearing in your hand. Its bearing code is no longer legible (or trusted), and so you’re forced to get the sizing yourself. 

To do this confidently, you’ll need the accuracy and resolution of a vernier or digital caliper. I believe it’s always worth investing in high-quality measurement tools, and I love my Mitutoyo Absolute Digital #500-196-30 for the confidence it provides. That said, more budget-conscious options certainly will work for this application. If Amazon doesn’t offend, then the Neiko 0147A is one example of a well-priced offering with a good reputation (this isn’t an affiliate link!) The Igaging Absolute Origin is another good option. And I’ve also heard of good experiences related to what supermarket chain Aldi has on sale occasionally. 

High-end digital calipers and an ultimately cheap plastic digital caliper measuring the same bearing. Both read 30 mm.
Ultra cheap versus ultra nice? Cheap calipers that are correctly zeroed before each use should be enough for measuring most bearings – however, pay extra attention when measuring headset bearings.

Perhaps more important than the absolute quality of calipers is being mindful that many require frequent zeroing –some will give false readings with low batteries, and if they’re bent, they’re no good. One related tip from Miller is you can test the approximate accuracy of your calipers by putting it onto a known bearing. So for example, say you had a 6903, the outside diameter should measure extremely close to 30 mm. 

If, for some reason, you’re allergic to calipers, then a fun but wholly unnecessary option is bench-top mats that double as bearing-size identification tools. Both Enduro and Wheels Manufacturing offer these with the main purpose of giving you a soft working surface, but I’ve always found it quicker just to measure bearings with a caliper rather than move them around on the mat like a two-year-old trying to put the square through the round hole. 

Benchtop mats that offer grip and non-scratch surfaces for service work. Both feature means for measuring bearings.
Bench-top mats with bearing sizing features exist from Wheels Manufacturing and Enduro Bearings. Both have super nice attributes, but I don’t use either for the purpose of sizing bearings.

In using the calipers, you want to provide firm but not forceful pressure on the jaws. It can help to give the item being measured a little wiggle to settle the jaws squarely. And if in doubt, measure again. If your calipers keep spitting out a different number each time, then it’s time to get yourself something a little better. 

First, you want to measure the inner diameter (ID) of the bearing, or in other words, the distance between the inside faces of the inner race. You’ll use the outward-facing jaws of your caliper to do this. Note this number down – often for a regular cartridge bearing (not a headset) it’ll be to the nearest millimetre.

Now using the inside-facing jaws of your calipers, measure the outside diameter (OD) of the outer race. Again, this will typically be to the nearest millimetre for a regular bearing. 

Finally, you’ll want to note the width (W) of the bearing. You can use the inside-facing jaws for this, or you can place the bearing on a flat surface and use the height gauge of your calipers. Again, this is typically to the nearest 0.5 mm.

These three measurements are the key numbers you require whenever shopping for new cartridge bearings. Often, you’ll see them advertised as ID x OD x W, or, for example, 17 x 30 x 7 mm for a 6903 bearing. 

A further note for those replacing full suspension pivot bearings, pay attention to whether the inside races are extended in width versus the outer race, or if the outer race has a flange on it. Such bearings are becoming increasingly common as they simplify the use of washers between pivot points. 

Two new bearings sit next to each other. One is of a standard shape, while the one on the right features an extended inner race and a flanged outer race.
Both are 6801 Max bearings, but obviously, one is not like the other. Watch out for extended inner races and/or a flange on the outer race.

Measuring cartridge headset bearings 

Modern headset bearings typically add further confusion through being of an angular-contact variant where both the inner and outer races are externally angled to allow for compression and some leeway in alignment. However, unfortunately for mechanics and consumers, the industry can’t decide whether those angle should be 36º or 45º, or a mix of both (an unconfirmed rumour suggests this difference came about through patent avoidance). 

Measuring a headset cartridge bearing is much like measuring a regular bearing. First you use a set of trusted calipers to get the bearing’s internal diameter, external diameter (often to the nearest 0.1 mm), and the bearing height (to the nearest 0.5 mm). Getting the angles is trickier, but the good news is that it doesn’t require purchasing any other tools (specialist headset-bearing sizing tools do exist, though I still prefer the following methods). 

Originally passed on by mechanic Kevin Wells of CycleZone Darwin, my method for measuring the outside angle (most of which are 45º) involves using a spare bearing with a known 45º outside angle. From here, you place the old bearing outside angle seat against the outside of the new bearing. If the old bearing has a 45º outer angle, then it’ll form a square corner (90º). If your old bearing is 36º, then you won’t achieve a 90º angle. 

Two headet bearings sat against each other to create a square angle.
A 45º outer race bearing placed against another 45º outer race bearing will create a 90º angle.
Two headet bearings sat against each other to create a non-square angle.
By contrast, placing a 36º angle bearing against a 45º angle won’t result in a 90º angle.

The inner angle can then be measured with a business card or credit card (assuming it has traditional square corners). If the inner race has a 45º angle, then the corner of a card will sit perfectly flat against both sides of the angled race. Meanwhile, a 36º bearing won’t allow both sides of the card to sit flush against the race. Either way, this method works well but requires a careful eye to spot the difference.

A regular rectangular business card is used to measure the inner race angle of a headset bearing. This image shows a 45º angle bearing.
The card sits flush against both sides of an inner-angled race. This is therefore a 45º angle.
A regular rectangular business card is used to measure the inner race angle of a headset bearing. This image shows a 36º angle bearing - although the difference is not blatant. .
Note the small gap between the card and the angled race on the left side? This tells us it’s a 36º inner angle.

Headset bearings will typically be listed with measurements of inner diameter, outer diameter, bearing height, inner race angle, and outer race angle. For example, a common size of bearing, also known as a TH-873, would be listed as 30.15 x 41 x 6.5 mm 36/45º.

The world of headset bearings is a weird one, with a ridiculous amount of options that shouldn’t exist, and where 0.1 mm can sometimes be a critical difference in the outer diameter, while other times that small difference doesn’t matter. Likewise, sometimes the height of the headset bearing is important to setting the appropriate gap between the headset top cap or fork crown, while other times, the frame or headset cup is shaped for it not to be critical.

Either way, replacing the stock bearing with an identically dimensioned one is a wise play. Below is a handy list of common headset cartridge bearing sizes, as provided by DIY-MTB:

Types of bearings and some basics 

Covering the various types of bearings, materials, tolerances, clearances, sizing, and more, would demand an entire series of articles. Most bearing manufacturers offer good basic intros to the broader topic, with SKF, Jtekt, NTN (this one is super techy!), and Enduro each providing such reads. Here, I’ll stick to some basics likely related to your bicycle bearing purchasing and, in turn, arguably over-simplify the topic.

Many cartridge bearings used within hubs and full suspension pivots will have a code beginning with a “6”, something that simply means the bearing is of a single-groove deep ball bearing design. If a bearing has a “7” (or an A added to the MR if in metric sizing) in its code, then it’s an angular contact (you can often confirm this if the inner race is thicker on one side). 

Another look at the Enduro benchtop mat. This time at the various bearing code definitions.
These are just a few common codes and acronyms found on bicycle bearings. Some of these are unique to Enduro Bearings (after all, it’s printed on Enduro’s bench-top mat).

When shopping for bearings through cycling outlets you’ll often come across references to ABEC3, ABEC5, Max, Ceramic, etc. The ABEC (Annular Bearing Engineer’s Committee) rating refers to the tolerance of the ball bearing, with the higher number corresponding to the bearings with greater precision, efficiency, and speed capabilities. In some cases, bearing manufacturers will also adjust other elements, such as the type of grease and seals, as bearing quality increases.

Those with full suspension bearings will likely see a reference to Max, otherwise known as full complement or maximum complement bearings. These are cartridge bearings where the ball bearing retainer has been removed in order to maximise room for more ball bearings. “These don’t roll as well, but the goal is more contact between the races and balls,” explained Miller of DIY-MTB. “These bearings are designed for static load versus full rotational load. They’ll often have a fill notch to assemble the final bearing in place, which people occasionally think is a fault with the bearing.”

Two bearings, each with one seal removed. On the left is a full complement bearing that is packed tightly with ball bearings. On the right is a more regular bearing, where each bearing is clearly distanced via the use of a ball bearing retainer.
A full complement (Max) bearing is on the left. On the right sits a regular deep groove ball bearing of the same size, clearly with far fewer ball bearings inside. These two bearings are designed to serve very different purposes.

The three to five-digit bearing code is typically followed by other letters and/or numbers, such as LLU, LLB, or 2RS. These designate the seal type, with 2RS meaning two rubber seals, LLU being a full contact seal for tighter protection, and LLB relating to a medium contact seal that offers less protection at the benefit of reduced drag. In some cases, such as on Enduro ABEC5 bearings, you’ll see an LLB seal on one side, and a LLU seal on another, which is based on the assumption that if installed in a hub then one side of the bearing needs less sealing than the other (often, merely keeping the internal grease fill in place is all that the seal is required to do on these hidden faces). These seals don’t change the dimensions of a bearing but sometimes they can impact how suitable a bearing is for the application. 

Where to buy cartridge bearings for bicycles 

OK, so now you have all your measurements and know the type of bearing you want. Where should you buy them from? 

Well-equipped bike shops are likely to have stock of common-size bearings and are worth a phone call. If your bike or component is of the consumer-direct variant, then you can likely buy replacements that way. Alternatively, an increasing number of cycling e-commerce stores now carry stock of bearing brands such as Enduro and CeramicSpeed. Speaking of, Enduro is a manufacturer that is often easily accessible and decently priced for consumers, while many other major bearing brands (like SKF, FAG, NTN, etc) focus solely on big industry business.

I like to go through specialist channels. For those in the UK, there’s Aire Velo, which is an awesome online retailer of all things bicycle bearing – their site is also an incredible resource for figuring out what bearing number you may need once you have measurements in hand or buying kits for products that claim to be non-serviceable. Also in the UK and of similar purpose (spoilt for choice you lot!) is Kinetic Bike Bearings.

In Australia, DIY-MTB is the nearest example with an exhaustive bicycle-specific range, although they’re a business-to-business wholesaler, so you will need a local shop to order for you. And for those reading this from the USA, well, there’s seemingly a business opportunity here for someone as it’s surprisingly slim pickings beyond Enduro bearings through more traditional cycling retailers/wholesalers.

A handful of new bearings in bags sit beneath a set of digital calipers.
Having a one-stop shop for all the weird sizes of bearings found in a modern bicycle can be a big time saver.

Speaking with a few trusted mechanics in the USA (Colin Williams of Boulder, CO, and Greg Thomas of Washington, D.C), limited options mean they often use bearings provided by the component manufacturer, particularly for hubs from DT Swiss, Phil Wood, I9, and Stan’s NoTubes (or Cane Creek in the case of its headsets). While these bearings are certainly not made by the brand printed on the component, they’re typically a high-quality option. A benefit is that you can be sure any clearance specifications of the bearings are matched correctly to the component – however, in reality, few bicycle components are so precise for this to matter hugely.

And, of course, you can always look outside of cycling, as, after all, most bearings in bicycles are industry-standard sizes (as in, not limited to cycling applications). Sometimes you may be lucky to live in a more industrial area with a local bearing retailer who may carry stock of trusted brands such as SKF, NTN, etc. Just don’t expect these suppliers to have weird headset bearings. Related to these brands, do be warned that counterfeit bearings do exist on marketplaces like AliExpress, Amazon, and eBay – if you find a big-name bearing brand for a few dollars, it’s almost certainly not the real deal as such bearings typically sell for a minimum of AU$15 (approx US$10) a piece.

Whatever you decide, it’s worth researching to see whether spending more for stainless races or ceramic balls is practical for you. Don’t fall too hard down that rabbit hole!


The return of Noble tools! 

A small handful of Abbey Bike Tools and Noble tools sitting on a bench.
Abbey x Noble = woot!

Time for a bit of tool news. London-based tool brand, Noble Wheels, was recently making some big moves in the wheelbuilding and bearing-service tool world, until suddenly, the brand hit the stop button on the lathe. The tools were no doubt premium in price, but each one offered a unique approach and a better method for lacing wheels, or extracting and installing bearings. I bought many of the tools and was super bummed to know others now couldn’t. 

In big news for bicycle tool nerds, I can now share that the tools will soon return to production, but with a twist. American-based Abbey Bike Tools has acquired the full catalogue of Noble’s designs and will begin production on the wheel lacing jigs and bearing extractors in April from its Bend, Oregon facility. According to Abbey Bike Tools’ founder, Jason Quade, other products will be brought into production as time allows. 

Furthering this feel-good story, you can also expect the Noble name to live on. “We will call out Noble on the website and on products where space allows,” finished Quade. 

Yeah … I’m dancing in the rain and clicking my heels kinda giddy over this news! 

Threaded will return in two weeks with an article dedicated to installing the fresh new bearings you’ve just measured for. In the meantime, please consider supporting this content by purchasing a subscription or membership to Escape Collective. Also, if you know someone who may enjoy this article and/or series, please share it with them.

Happy wrenching!

What did you think of this story?