
Disc brakes are everywhere now, and Shimano’s splined centerlock rotor mounting system has won out as the standard for premium dropbar bikes. Today, centerlock rotors are offered by all major manufacturers of groupsets and brakes, and you’ll be hard-pressed to find a high-end road or gravel wheelset in anything other than centerlock.
Meanwhile, the older six-bolt rotor mounting method (and rarer four- and five-bolt variants) remains largely favoured in mountain bikes and lower-end offerings, providing ride-friendly bolt tightening advantages, the potential for bigger hub bearings, and arguably easier manufacturing. If you’re seeking an easier time dealing with six-bolt rotors, I suggest catching up on the previous Threaded edition related to Torx. And if you’re still struggling, then check out the past edition related to overcoming rounded bolts.
Whatever your rotor-mounting preference may be, the elegance of having a rotor held on by a single lockring has brought centerlock to prominence. It’s typically dead simple to work with, too. In a nutshell, you use either a cassette or bottom bracket tool to thread a simple lockring in place: job done. However, there is always nuance to such a simple task, and variations of centerlock lockrings now require modern solutions.
So, with that, and keeping in mind we’re dealing with a safety-critical component, let’s get a little geeky on the topic of centerlock lockrings.
If you’re new to Threaded, welcome. I encourage you to check out previous articles from the series. If you don’t want to miss an edition (there’s a new one every second week), you can sign up here for free to receive an email notification.
Internal vs external
Today, the centerlock interface is largely standardised with a 35.5 mm-diameter splined interface on the hub. You can grab any modern centerlock hub and match it with any modern centerlock rotor (if we choose to ignore the super rare first-generation Shimano Saint).

While the rotors and hubs may be the same fitment, there are differences in the threaded lockrings that tie them together. Shimano now offers most of its rotors with a choice of either internal or external lockrings, with the word referencing where the tool spline sits.
Internal means the use of an internal tool, or more specifically, a common HG-style Shimano cassette tool. This is where Centerlock started, and it came at a time when most bikes were still using skinny 5 mm quick-release skewers with room to play.

Larger thru-axles – namely the 15 and 20 mm sizes found on mountain bikes – demanded a lockring with more space, and that’s where external lockrings first appeared. As you may have guessed, external refers to an external fitting tool, which happens to be shared with common 16-notch 44 mm (major diameter) bottom brackets.
Generally speaking, most mountain bikes running centerlock will use external lockrings, while most road/gravel bikes will use internal lockrings. There are, of course, exceptions. For example, some road/gravel hubs feature axle end caps too big for use with internal-type lockrings. Meanwhile there are some known clearance issues between external lockrings and some tightly spaced road and gravel forks – meaning thin-splined external lockrings now offer a solution to a problem that internal-style lockrings had already solved.
It’s these thin-flange external lockrings that sent me down the road of seeking better tools and solutions. With little tool engagement, and made of delicate aluminium, they present many of the same issues experienced with T47 internal bottom brackets. And with SRAM/Zipp now supplying such lockrings as stock, you can bet it won’t be long before you find value in owning more appropriate tooling.


The odd stuff
OK, I know I just said all centerlock is standardised and there are only two forms of lockring? Yeah, well, I lied.
When Shimano first created centerlock, it briefly offered an oversized 47 mm spline in its Saint downhill component range. That didn’t last long as Shimano soon realised it could achieve much the same goals with an external-type lockring and a regular rotor. Still, if you come across one of these oversized splines in your journey, you’ll need a Shimano TL-LR20 lockring tool – I have one and I’ve never used it.


Then there’s the current weird one in Shimano entry-level range that's equipped on approximately a bajillion bikes. It’s Shimano’s Tourney-level steel rotor lockring (SM-RT10) that offer an incredibly thin external spline for mechanics to fight with. What’s lesser known is this lockring has an easily overlooked secondary internal spline that works with Shimano’s single-purpose TL-LR11 lockring socket. If you frequently deal with these often-rusty lockrings then you’ll greatly benefit from owning this affordable tool.
To confuse things a tad further, Campagnolo, Fulcrum, and Classified hubs feature a male-threaded hub shell that calls for a proprietary female-threaded lockring. The good news is that these share the same tools as regular external-type lockrings. Phew.

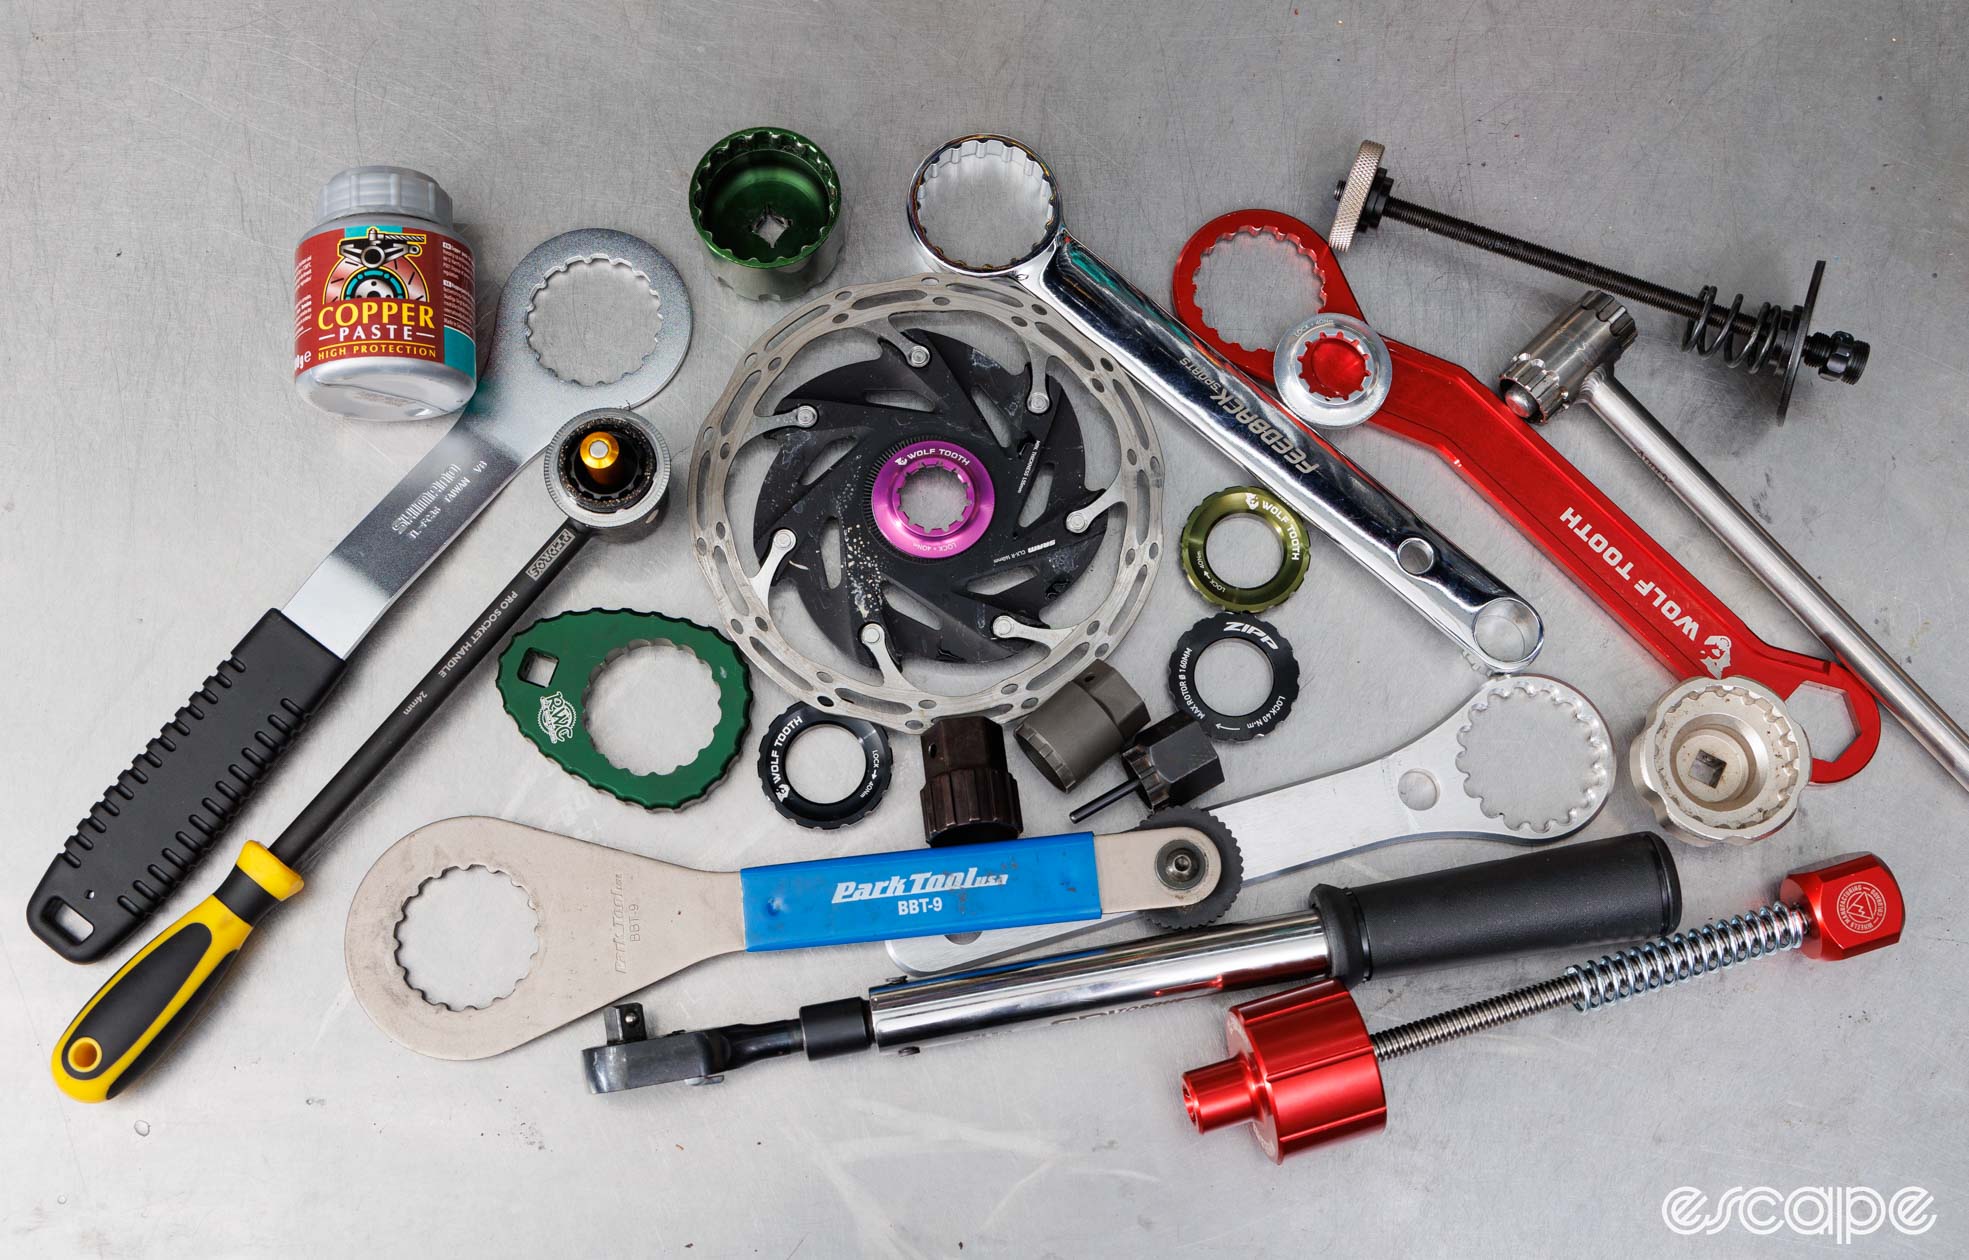
My favourite centerlock tools - internal
With internal lockrings using a common Shimano-style cassette tool, you probably already own suitable tooling. That said, centerlock does demand a tool with enough internal clearance to pass the protruding hub axle (longer on the rear wheel). As a result, many older and/or cheaper cassette tools can fail to reach. With that, let me explain what I choose to use and why.
My go-to for internal lockrings (and cassette lockrings) is a classic Abbey Bike Tools Crombie. The fitment tolerances are great, the durability is insane, and having the tool integrated into the handle means not only do I just need a single tool; I can spin it without fear of things flying.

I will often use this same tool for tightening, although I do advocate for the use of torque wrenches (I’ve developed a good sense for what 40 Nm feels like, and blind-testing has shown I'm consistent). Despite being confident in my wrist-based clicker I'll still use a torque wrench on premium hubs, and that requires an appropriate socket-type tool with enough internal clearance to get past the protruding axle end cap (a bigger issue on the rear wheel).
In these cases I’m fond of Abbey Bike Tools’ Crombie Socket and Pedros’ new Pro cassette lockring tool – both offering a snug fit and a 3/8" square drive interface. The Pedro's can also be used with the company's handle or even an adjustable spanner and offers an internal guide (can be purchased without), while the simpler Crombie feels like it'll survive a lifetime of trying to break it. That said, even low-cost cassette lockring sockets typically perform well enough, and so as long as they have adequate axle clearance, you’ll be fine.


Want something light to travel with that makes it easy to rip your rotors off for safekeeping? I’ve tried custom-made tools, hacked together socket-based kits, and am yet to find anything lighter or better than Wolf Tooth’s Pack Wrench with its matching Shimano Cassette socket. It’s not a cheap combo, but it’s perfectly capable of handling regular use in a home workshop, and is impressively minimalist for travel purposes.
My favourite centerlock tools - external
External centerlock lockrings call for a commonly sized bottom bracket tool, but once again, the protruding hub axle on the disc-rotor side can present fitment issues with a surprising number of tools.

The easiest and cheapest way to overcome such axle clearance issues is to use a spanner-style bottom bracket tool, such as the classic Park Tool BBT-9. These spanner-style tools also have the added benefit of keeping the applied torque in the same plane as the tool interface which helps to avoid cam-off – it’s something I’ve previously covered in dealing with thin-spline T47 and more generally with rounded fasteners.
It’s worth noting that some of these spanner-style tools (again, such as the BBT-9) will rest across the rotor braking surface when in use. For this reason, I prefer a wrench with a slight angle that keeps the handle clear of the rotor. The best example of this is the Shimano TL-FC36.


Ultimately, I mostly use a socket-style bottom bracket tool for external lockrings. A big part of this is my habit of holding the wheel horizontally between my waist and the workbench in front of me, and from there, it feels more natural to use a long ratchet. When using a ratchet or torque wrench, you’ll need to find a bottom bracket socket that has intentionally been made to fit over hub axles (most don’t). My go-to is the Abbey Bike Tools “Common” socket, which is specifically made deep for this purpose, while the tool spline is now machined flat for great engagement with thin-spline external lockrings.
Most external-type lockrings, such as those from Shimano, Wolf Tooth, and Ogle (oooh, fancy) offer a decent amount of a tool engagement and are easy to work with. However, there are a number of thin-flange lockrings on the market (such as from SRAM), which can present issues in keeping the tool engaged. In these cases it’s best to avoid bottom brackets tools that taper or bevel the tool spline from the edge. You ideally want something that carries that spline right to the face of the tool.

If you find yourself slipping off thin-flange lockrings then it may be worth considering a bottom bracket tool that can be secured to the hub. Spanner-style bottom bracket wrenches can be configured this way with a regular hub bearing press or rigged up with some threaded rod. Meanwhile, Wheels Manufacturing’s Centerlock Socket or Park Tool’s BBT-69.4 can both be secured in place via their respective threaded rod systems and can then be combined with a torque wrench without fear of slippage. Just a note on that Wheels Manufacturing socket: experience has shown that its deep shape is prone to cam-off and so it truly needs to be combined with its press-rod for safe use, but when done so, it’s great.
Speaking of using a torque wrench, I use the Abbey Common bottom bracket socket tool, or if I’m scared of slipping, I’ll pull out the Wheels Manufacturing Centerlock Socket and accompanying press. A third option I appreciate is the crow-foot-style tool from Real World Cycling (RWC).


Travelling? Once again I’m yet to find anything that beats the Wolf Tooth Pack Wrench. It’s super light, and the brand offers accompanying 6 or 8 mm hex sockets for pedals/cranks that afford heaps of leverage without the usual weight penalty. If you just want a simple aluminium wrench with nothing else, then WCM offers such a thing (DIY-MTB for any Aussies reading). And another option is the Terske Rotor Lockring Tool that uses your rear thru-axle as the handle. It’s clever and well-priced (though currently sold out at the time of writing), but I prefer not to use greasy things as handles.
How to properly torque centerlock
One of the most commonly shared complaints related to centerlock rotors is a rotor coming loose on a ride and there being no way to tighten it. Sure, you could carry a travel-friendly tool as covered, but I know I wouldn’t take such tools with me, just like I don't ride with a floor pump.
Centerlock lockrings and rotors offer a notched interface that offers a mechanical hold, but the effectiveness of that relies on proper torque. Rotor loosening is almost always a case of insufficient torque on the lockring. Most brands call for 40 Nm torque on the lockring (some call for 50 Nm), and in my experience, most people under-torque this component. Add in that few own a torque wrench or suitable socket-style tool to do this task, and it’s not too surprising to see how common loose rotors are.

Of course I’m all for owning a torque wrench in the 10-60 Nm (approx) range for tasks like this, crank bolts, direct mount chainrings, and more. A great entry-point is a beam-style torque wrench (such as the Park Tool TW-2.2), but low-cost clicker-type wrenches are typically trustworthy in this torque range. Just be sure to get one that can torque in clockwise and anti-clockwise directions.
If owning such a tool isn’t an option, then the next ideal would be to borrow a torque wrench capable of doing 40 Nm in order to establish a feel for how tight this is. Alternatively, you can use a handle with a known length, a hanging scale, and some math (16 kg applied to a 250 mm handle will get you near 40 Nm).
To grease or not to grease
Look to the instruction manuals of SRAM or Shimano and they both wholly ignore the question of whether you should add any lubricant, thread locker, or anti-seize to the rotor lockring. Going by the manuals, the brands want you to install the lockrings dry, but is that really best?
It’s a question that’s been on my mind for ages and so I asked around. And sorry to say, there’s no clear answer to this one.
Shimano, SRAM, DT Swiss, and Wolf Tooth all confirmed it’s a fear of contaminating the braking surface that lead all those brands to recommend installing lockrings with nothing on them. One theory shared is that the braking heat and centrifugal force of a spinning wheel could force said lubricant outward and onto the rotor surface. And with most rotor lockrings being anodised aluminium and threaded into an aluminium hub shell, there’s little risk of corrosion through dissimilar materials. Centerlock has been around long enough to prove that dry installation is generally fine.
Still, not all lockings are aluminium and I found enough people who agreed with me that threads should be lubricated. For example, a number of Shimano’s North American tech reps told me that many of their dealers in rust-belt states always use grease on the lockring, and many also grease the splines of cheaper rotor carriers after having seen a number seize on.

As the maker of the world’s fanciest titanium centerlock lockrings, Josh Ogle suggests using a grease on the lockring thread. “I actually don’t bother with anti-seize on anodized aluminum to titanium," he says. "Just good ol’ grease. Everywhere. I’ve been using Morgan Blue Aquaproof paste with pretty great results.” Anti-seize is known to make a mess and be hard to wipe away, and it’s for this simple reason that Ogle typically avoids the stuff.
Another in the lubricate-it camp is Josh Poertner of Silca. “It's not the end of the world to assemble dry, but it will damage the anodize and your torque will be highly variable due to the stick-slip nature of anodize to anodize or even machined aluminum to anodize surfaces," he says. "My understanding is that most of the brands only say not to lube due to contamination or migration risk, which is where anti-seize shines. It's extremely stable and non-migratory up to temperatures above the structural temperature limits of the aluminum, and if you apply to the female thread, there is really no pathway for it to migrate out anyway.”

If you do decide to lubricate the thread (whether with grease or anti-seize), then just a little applied to the thread in the hub shell will do it. Less is more when it comes to not ruining your clothes while using anti-seize.
A quick tip
In asking around about common issues experienced with centerlock, the only answers were related to proper torque and not cross-threading the fine thread.
“One of the installation tips I give customers is to rotate the lockring counter clockwise a full turn before beginning to thread it into the hub to make sure it’s not cross-threaded," Ogle says. "Which has the pleasant side effect of getting some grease onto the face and start thread of the hub."
Things in my feed
As seen from around the wide world web:
- A Korean bicycle mechanic showed how an inner tube can be effective at undoing super tight crank bolts. It piqued my interest enough that I went ahead and tried it myself and then wrote about it.
- Escape Collective member and 3D-print wizard Chris Heerschap has further improved on the FlipDag, an upgrade piece that adds a pivot function to the derailleur hanger alignment gauge that many already own.
Coming up
Loosening a crank with an inner tube inspired me to share some other tips and tricks for dealing with stubborn fasteners and components. Threaded will return to your inboxes and this site in two weeks.
Did we do a good job with this story?

